
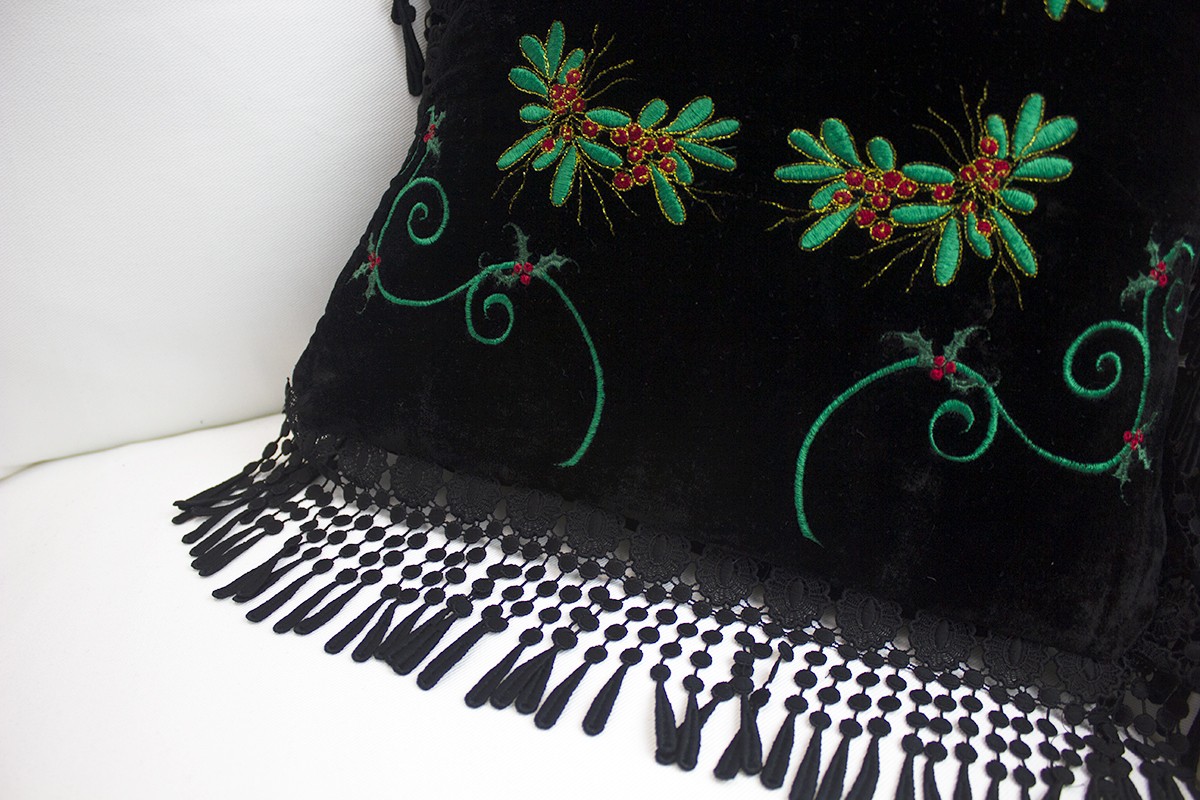
Embroidered Velvet Pillow with Holly Designs
Elegant Embroidered Velvet Pillow
by Katrina Walker
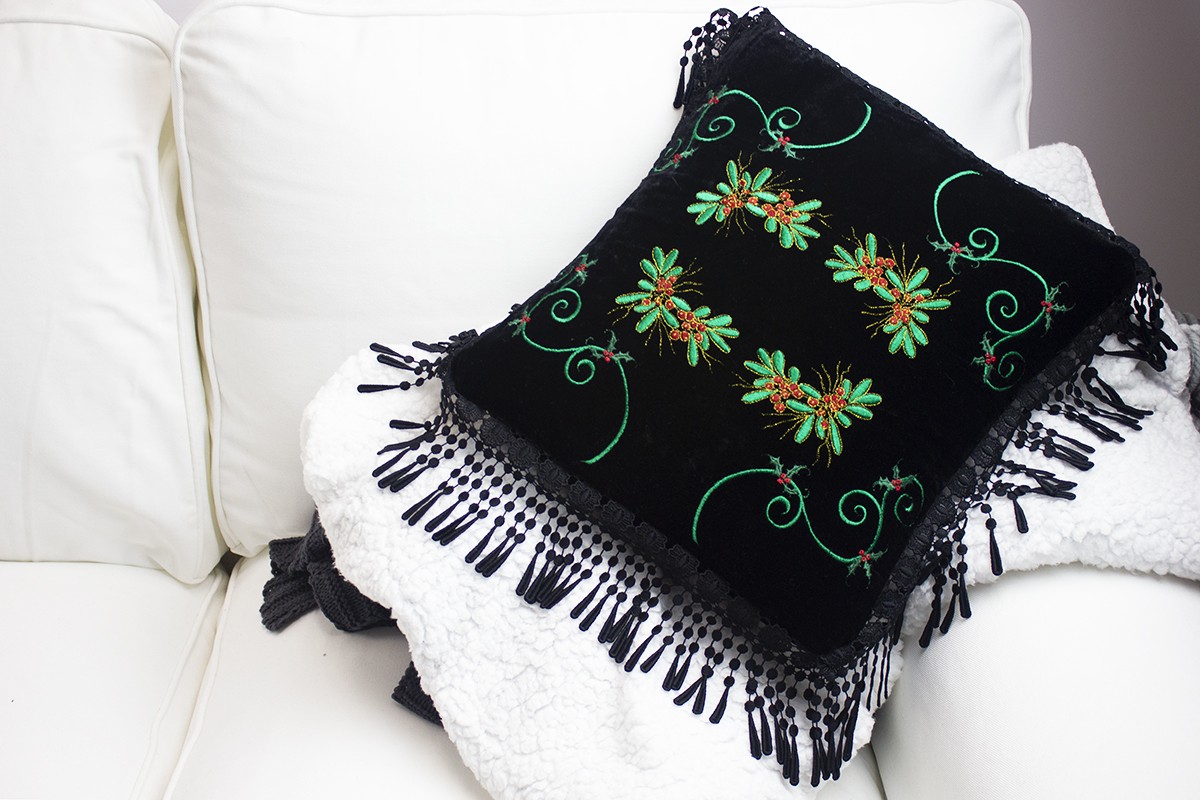
Add extra elegance to your holiday décor with a luxuriously embellished embroidered velvet pillow. Festive holly and mistletoe embroidery give a spark of color, and a wide lace border makes a dramatic statement. Follow these steps for a fabulous look that is easy to sew using Sulky Sticky+ stabilizer to tame the shifty velvet.
SUPPLIES
- Fabric: 1/2 yard 44″ wide velvet or velveteen
- Trim: 2 yards wide lace fringe trim
- Pillow: 16″x16″ pillow form
- Thread: Sulky Machine Embroidery Holly Palette (Optional: Sulky Original Metallic thread in Gold); black Sulky bobbin thread
- Embroidery Designs: Sulky Machine Embroidery Holly Palette
- Stabilizer: Sulky Sticky+, Sulky Solvy
- Needle: Organ® Needles Titanium Size 90/14
Note: a 1/2″ seam allowance is used to construct the pillow. The pillow is intentionally sewn slightly smaller than the pillow insert to ensure an attractively taut pillow.
Create Velvet Pillow Cutting Templates
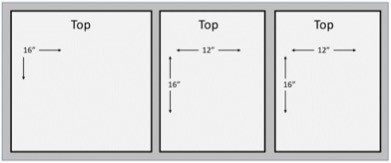
Velvet can be difficult to cut accurately and sew because of its plush pile. To make it easier to cut and sew the velvet for the pillow, create templates from Sulky Sticky + stabilizer first. To do this, cut Sulky Sticky + stabilizer into the following pieces:
(1) 16″ x 16″ square (pillow front)
(2) 16″ x 12″ rectangles (pillow back pieces)
Once the stabilizer is cut, peel off the backing from each piece and stick it to the wrong side of the velvet, as shown:
Mark the top of each piece on the stabilizer. Trim the velvet around the edges of each template. Use a serger or wide zig-zag stitch to finish all raw edges of each velvet rectangle. Leave the stabilizer intact during the pillow embroidery and construction to keep the velvet from shifting.
Stabilize Velvet for Embroidered Pillow
Velvet pile is easily crushed or damaged by the compression and friction of hooping fabric. To avoid this, hoop a layer of Sulky Sticky+ stabilizer in the hoop with the sticky side up, and then peel away the paper to expose the sticky surface. Print a template of the embroidery design to aid with placement of the design. Align the velvet in the hoop according to the template and gently press into place onto the sticky stabilizer.
Place a layer of Sulky Solvy on the velvet surface to help the stitches float on the surface of the pile. Use the baste-in-the-hoop function to baste the topper in place inside the hoop ring.
Embroidering Velvet
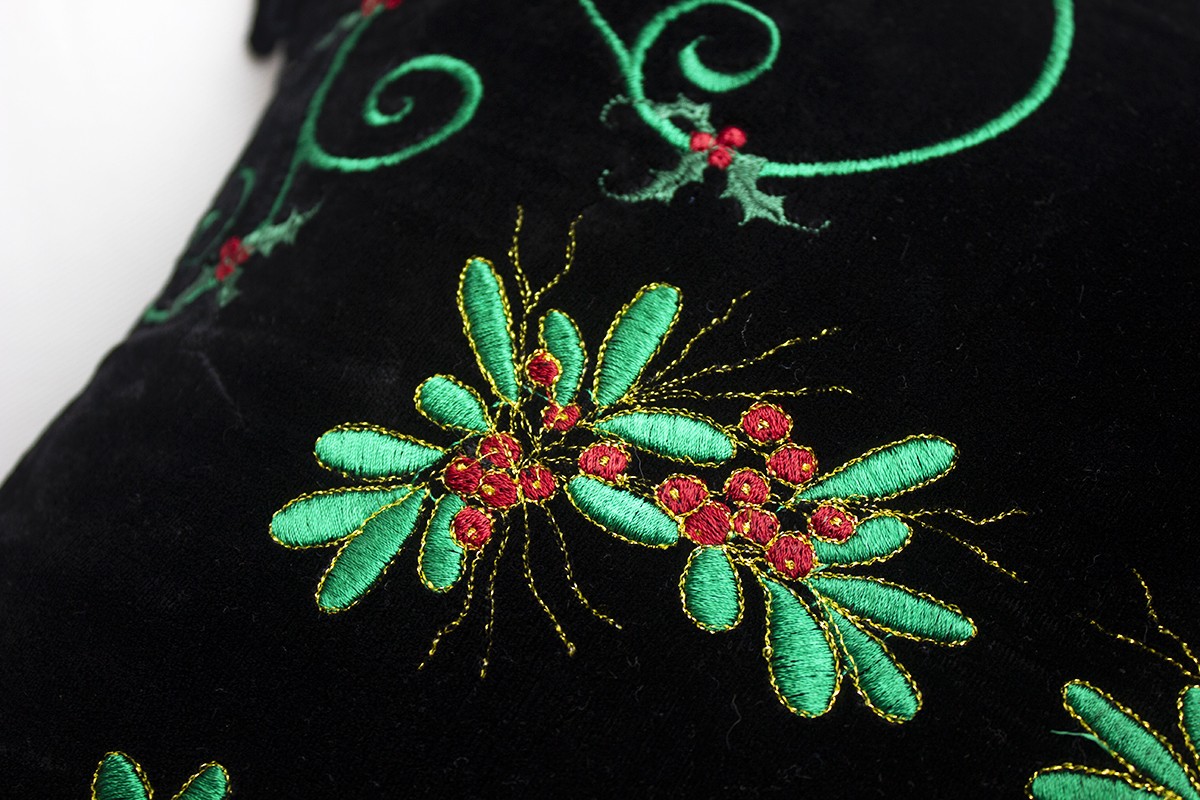
Thread the embroidery machine with Sulky Rayon embroidery thread from the Sulky Machine Embroidery Holly Palette, according to the embroidery design color instructions. For the sample pillow, the last color in the center embroidery motifs was substituted with Sulky Original Metallic thread in Gold. Use black bobbin thread (either wound or pre-wound) in the bobbin.
For this embroidery, a size 90/14 Titanium needle was used. A topstitch or embroidery needle would also work well. A larger needle helps to protect delicate threads from the extra friction caused by the velvet pile during stitching. The titanium coating on the needle helps to lessen needle heat that can cause thread breakage.
Embroider the design(s), repositioning the pillow for additional hoopings as needed to complete the embroidery.

Constructing the Embroidered Velvet Pillow
Once the embroidery is complete, remove the basting stitches and gently remove the topper film. Use tweezers and a damp cotton swab to remove any small stubborn stabilizer bits.
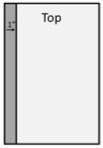
On one 16″ x 12″ back piece, fold one long edge toward the wrong side to create a 1″ hem. Stitch the hem in place.
Slightly round off the corners of the embroidered pillow front, and baste (or mark with an easily removed chalk marker) the 1/2″ stitching line around the edge of the pillow.

Align the pillow lace fringe along the marked stitching line, with right sides together and trim facing inward, and pin in place. Overlap the ends of the fringe so they blend together, and trim off any excess. Baste the fringe in place.

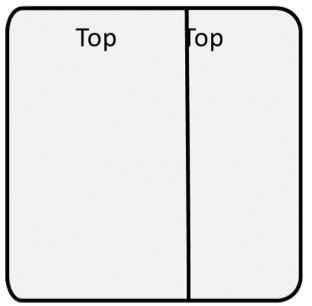
Place the back pillow pieces onto the pillow front, with right sides together and the “tops” of the pillow pieces aligned. The back pieces will overlap, with the hemmed back piece underneath the unhemmed piece. Gently round off the corners of the back pieces to match the shape of the front pillow.
Stitch the pillow front to the overlapped pillow backs. Turn the pillow right side out and fluff out the lace fringe. Insert the pillow insert through the overlap at the pillow back. If the pillow fabric is stiffer than desired, gently tear away the Sulky Sticky+ stabilizer after construction.

Ellen March
I am the Director of Content for Sulky of America. The former Editor in Chief of Sew News and Creative Machine Embroidery magazines, I hosted Sew it All TV on PBS for nine seasons. I've appeared on It's Sew Easy on PBS, DIY Network's Uncommon Threads, Hallmark's Marie Osmond Show, MacPhee Workshop and more! Come sew with me!


2 Comments
Marcia Chamberlin
Do you have a kit for the pillow?
Ellen March
Hi Marcia,
No, not for this one! We have some other pillow kits available on our Kit page if you’re interested in something different.
Thanks for reading,
Ellen