DIY Monogrammed Cork-Bottom Bag
in 14 Easy Steps
Whether you need it for the beach, going to class, a game-day tailgate party, or to carry your latest sewing project, this tote is a perfect size and is always in style. I have made several of these as gifts and the recipients always love them. They always comment about how the cork bottom gives it just the right touch of sophistication. The best part is they are so simple to make!


Supplies
4 Fat Quarters or 1 yard of fabric
2 pieces of cork fabric cut to 18″ x 4-1/2″
2 straps, each 57″ long
Fabric Marker
Sulky Soft ‘n Sheer Extra™ or Sulky Fuse ‘n Stitch™ Stabilizer for extra stability
Cotton+Steel® Thread by Sulky or Sulky 30 wt. Cotton Thread
Sulky 40 wt. Rayon Thread for the machine embroidery
Sulky Cut-Away Plus™ Stabilizer
The Monogram –
- I used Interlocking Vine Satin & Filled Alphabet from SWAKembroidery.com. I made sure the center of the monogram was 9″ in from the edge, and about 7″- 9″ up from the bottom. That is your preference; you decide where you want the monogram to sit on the bag vertically, but centering it horizontally is pretty important.
- I used Sulky 40 wt. Rayon Thread in the top and bobbin and I used Sulky Cut Away Plus because the this design is pretty dense (heavy and thick).


Directions
- Cut 2 fat quarters 18″ x 15-1/2″ for the outside fabric (be mindful to keep the monogram centered); and cut the other 2 fat quarters 19-1/2″ x 18″ for the lining. The 2 cork pieces should be cut 18″ x 4 1/2″

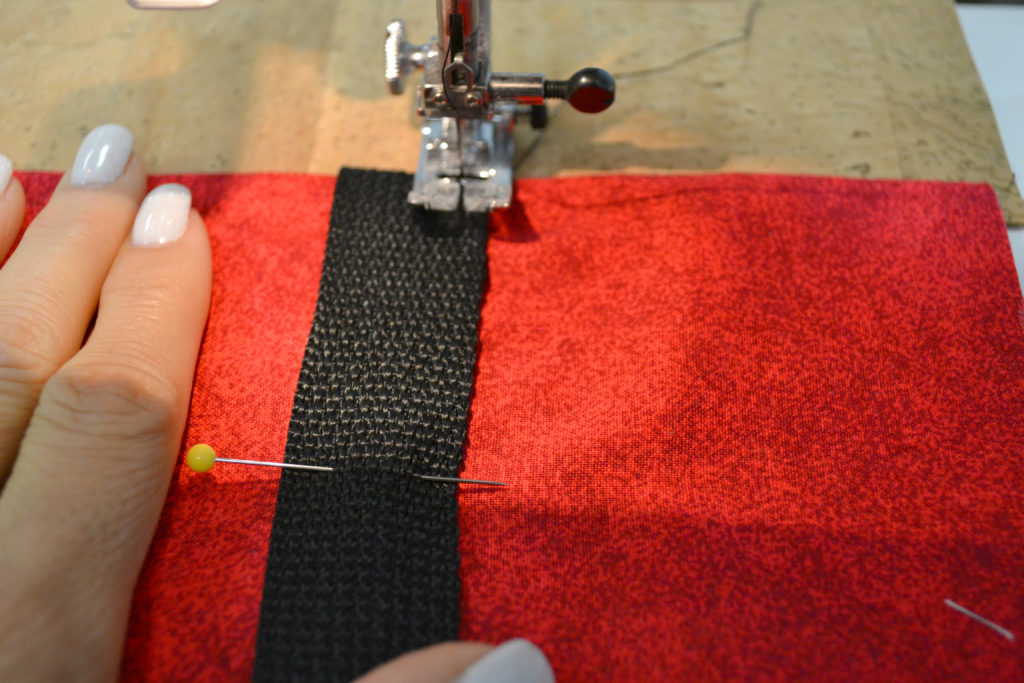
- Pin the straps in place, 3-1/2″ in from each of the sides.

- Use the Clover Wonder clips instead of pins (you can’t pin the cork because the holes from the pins don’t go away); and with right sides together, sew the cork piece onto the bottom of the fabric (the 15-1/2″ bottom) with a 1/4″ seam allowance. (Hint: Place the flat side of the clips on the bottom, as shown below, for easier stitching.)


- Press the seam towards the fabric. Surprisingly, the cork fabric acts very much like regular cotton fabric. I did use a medium temperature on my iron but I probably could have used high heat and been fine. As always, test before you ruin a project!
- Topstitch the two sides of each strap, and leave 1/2″ unstitched at the top. Be sure to backstitch at the start and end of each stitching line.

- Place the front and back pieces right sides together, and sew the sides and bottom together with a 1/4″ seam allowance.

- Box the bottom corners by laying the corner out, match the side seam with the bottom seam, and measure in 2″ from the corner.

- Mark the line and stitch. Be sure to backstitch.


- Now for the lining! I stabilized my bags by fusing Sulky Soft ‘n Sheer Extra to the lining pieces of the bags. For extra stability, use Sulky Fuse ‘n Stitch.


- Sew the two lining pieces, right sides together, along both sides and across the bottom, with a 1/4″ seam allowance. Box the bottom the same way you did with the outside pieces.

- Fold and press 1/2″ down on the top of the lining (folded over so the wrong sides are touching).
 Do the same with the outside piece (this is why you didn’t sew the strap down that last 1/2″ at the top). NOTE: If you bought Nylon straps, be careful with the iron, they could melt (ask me how I know 🙂 ).
- Turn the outside of the bag right sides out, and put the lining inside.
- Carefully clip the top edges together matching the sides seams. This is also your chance to do a reality check – the lining with the outside – and adjust if one is bigger than the other.

- Topstitch the lining to the bag about 1/8″ from the folded edge.


You are done! Enjoy your new cool bag.
