
This series is written by guest blogger, Pamela Cox. Pamela is an expert embroiderer, designer, digitizer and all around wonderful girl! We are so happy to have her contributing to the Sulky Blog!
Leather
Leather is not as difficult to embroider on as one might imagine. However, it is important to first understand leather’s properties and then to follow a few rules to ensure success.
 “Fabric” is made up of woven or knitted threads which can stretch, move and recover. Leather does not have this “memory” and is therefore not forgiving. Once a mark, or a hole, has been made in leather, it is forever there. “Unforgiving marks” also encompass those which are incurred by direct hooping, pinning seams, removal of incorrect stitching, marking centers, etc. In other words, leather needs to be handled with “kid gloves” – pardon the pun.
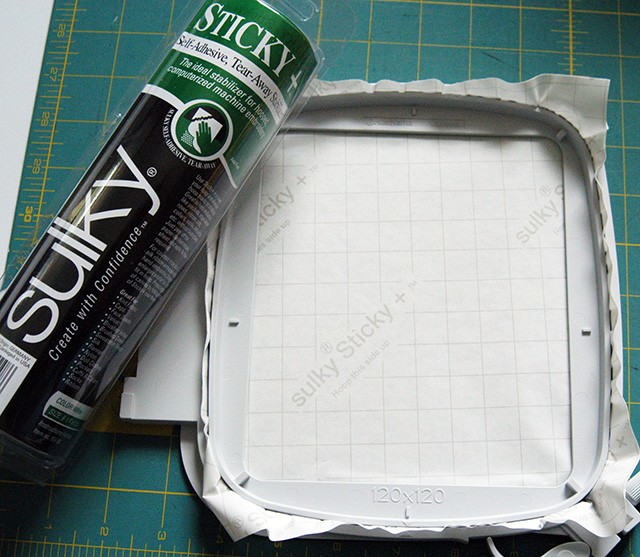
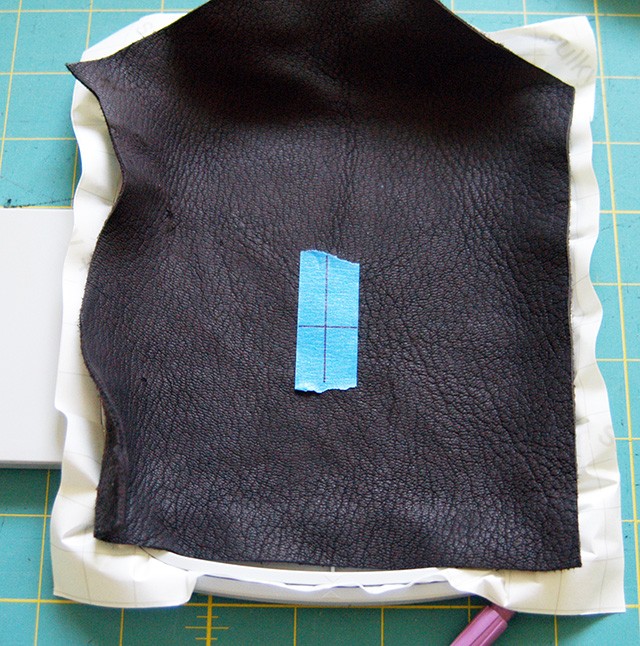
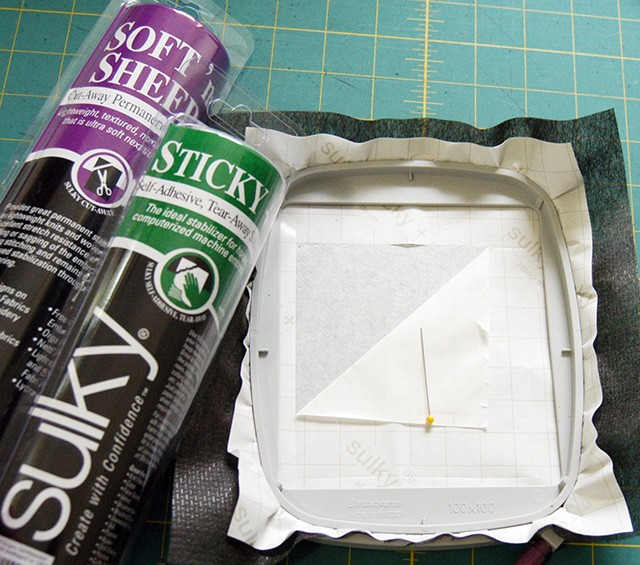
Leather cannot be hooped…period. Not only does the thickness of the material not lend itself to even, secure hooping, the hoop pressure will mar the hide. Secure a piece of Sulky® Sticky+™ in the proper size hoop with the release sheet intact and facing up.
Lightly score the paper surface with a pin, lift the paper up inside the frame and remove it.
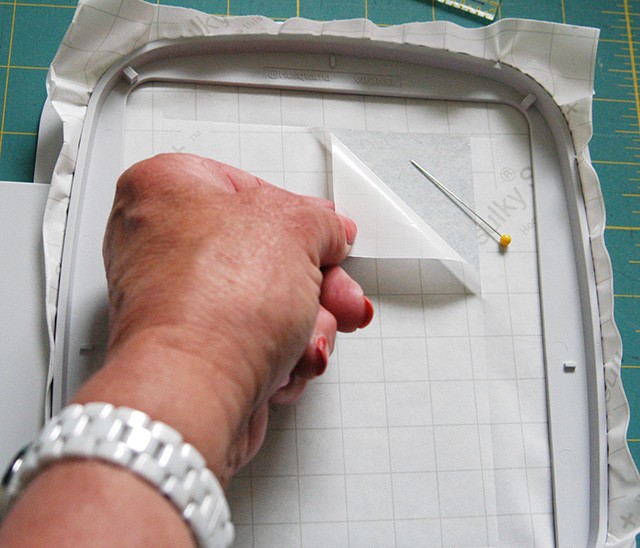
A grid mat placed underneath the secured stabilizer will offer a visual of center, however, feel free to draw directly on the stabilizer with a fabric safe pen if needed.

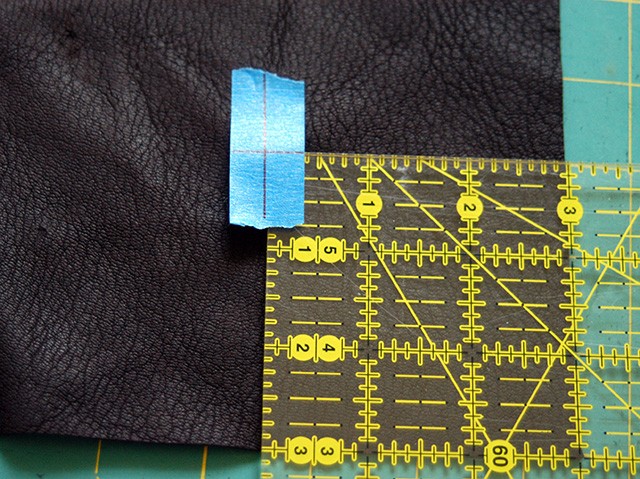
If design placement matters on the leather piece, draw a “+” on a piece of painter’s tape and gently press in proper position. Hint: Don’t forget to remove the tape once the hoop is on the machine and the center is established. 🙂
Firmly place the leather piece onto the sticky stabilizer surface, keeping it smooth and wrinkle free.
Once the embroidery is completed, the hide will easily lift from the sticky surface and the stabilizer can be gently torn away from the design.
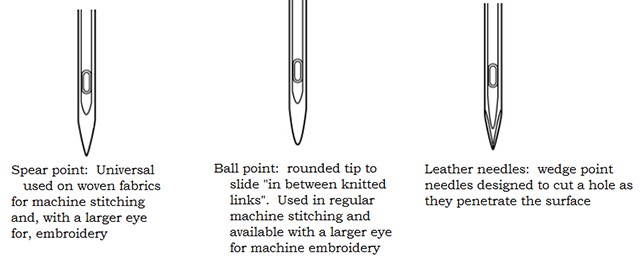
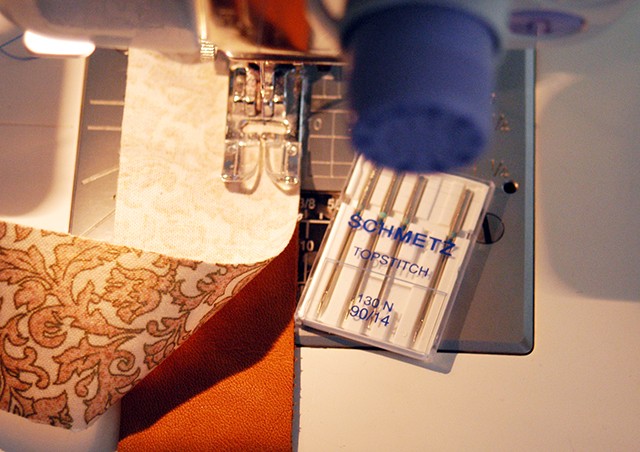
Now that we understand how to successfully hoop leather, it is also important to understand how to successfully stitch on this non-forgiving surface. Let’s first look at the specialty Leather needle required not only for joining leather pieces, but also required during the embroidering process. Leather, be it natural or synthetic, must be “sliced”. Machine needles designed for woven fabrics, “pierce” fibers. Ball-point needles designed for knitted fabric, “part” the links. Leather needles need to, and will, cut the hide.
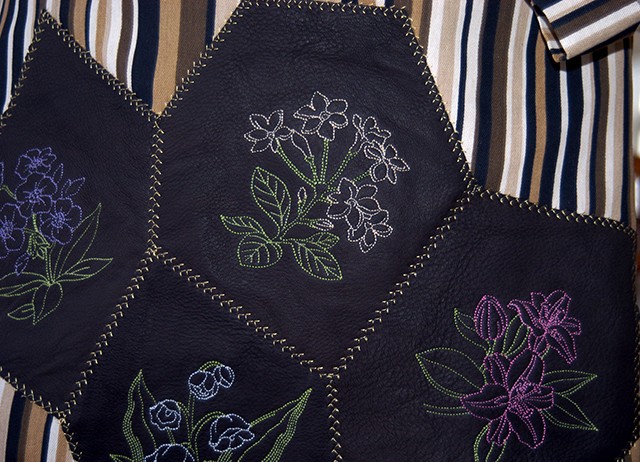
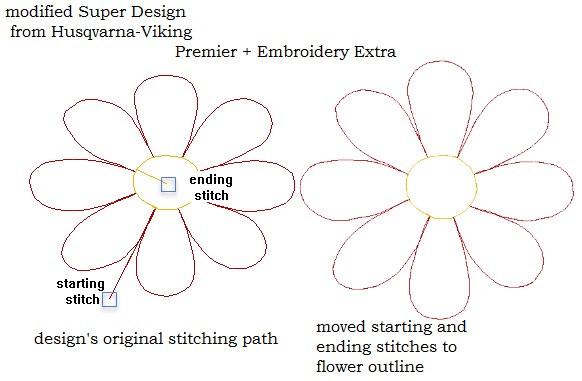
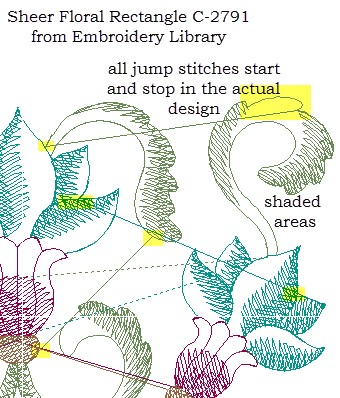
The need to cut the surface limits the type/style of acceptable machine embroidery to “line designs”. It is important to understand how the design will stitch out prior to embroidering the expensive leather piece. Remember, every needle penetration leaves a hole! Some digitizers always begin their designs from center, jumping to the true area of stitching. Either delete this stitch or advance your machine to the true stitch area.
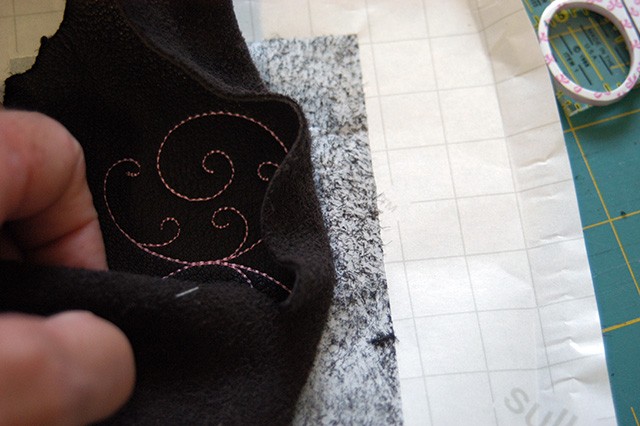
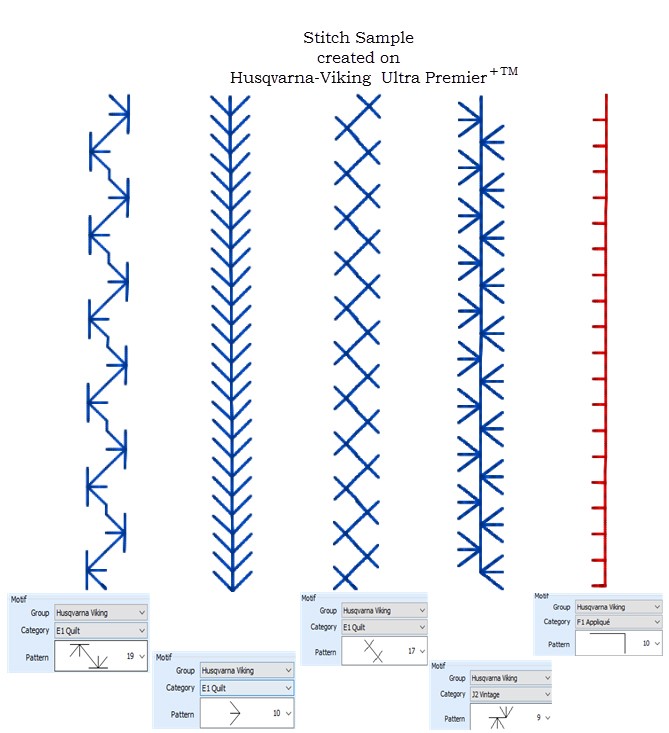
In addition to outline embroidery, there are designs digitized specifically for leather which add shading or minimal fill by repeatedly using the same needle hole entry.
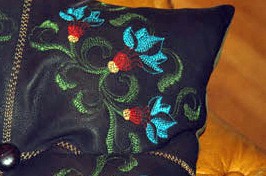
Often designs digitized for paper, another non-forgiving surface, are applicable for leather. If concerned that shading stitches may compromise the integrity of the leather, include a layer of Sulky Soft ’n Sheer™, hooped underneath Sticky+ to add extra support (shown below – Black Soft ‘n Sheer).
This stabilizer is easy to cut away from the outside of the design, yet will continue to provide a stable foundation to the embroidered area without affecting the feel of the leather. Leather can be combined with fabric for projects. Use an appropriate size top-stitch needle for stitching the seam with the fabric on the top when feeding into the sewing machine.
If ironing is needed, protect the leather from the heat and steam of the iron by using a pressing cloth.
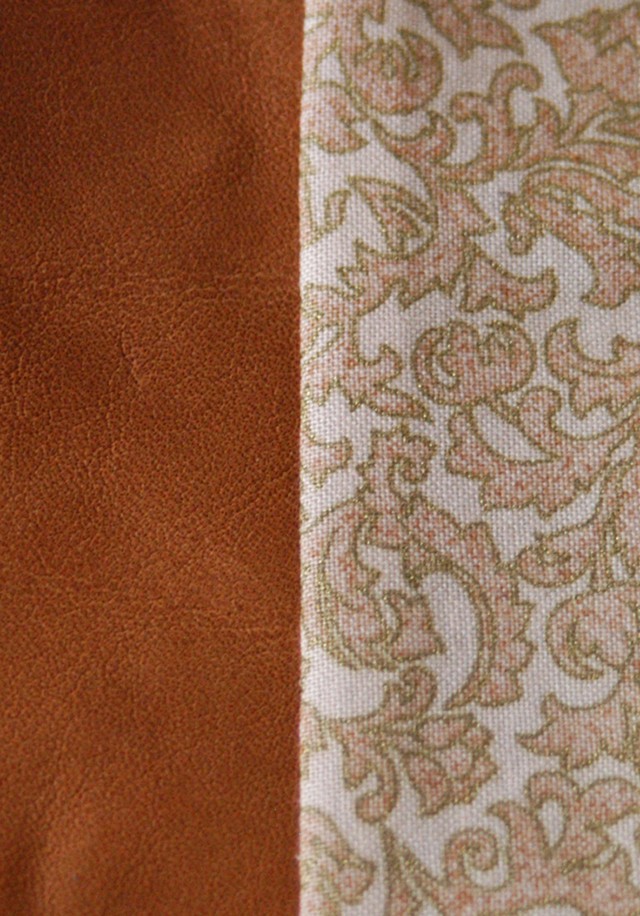
Leather can also be combined with other leather pieces by butting straight edges against each other. Choose a machine stitch that will “bite” into each of the strips.
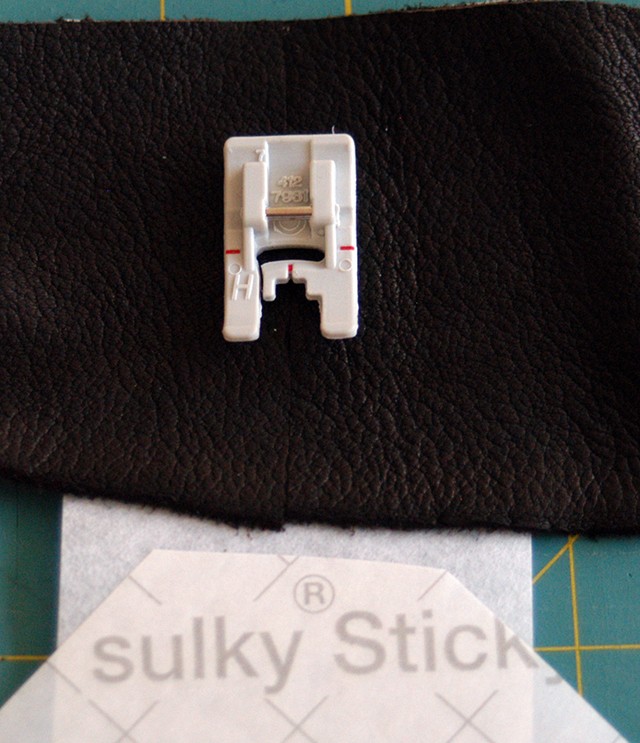
Place the first leather edge on a strip of Sulky Sticky+. Butt the joining seam next to it. The sticky stabilizer will insure that the pieces do not move during the stitching process. Use a Teflon® presser foot which will glide over the textured leather surface.
Many wonderful projects can be made from or accented with leather. Look for leather in fabric stores which sell upholstery fabrics or on-line. Read about the different types, weights and feel of leather hides to ensure purchasing the right one for the project.

Credits: Embroidery designs from Embroidery Library’s Vintage Flower Category Available at: www.emblibrary.com

Thank you, what kind of thread do you use?
Sulky 40wt Rayon was used for embroidering. Decorative stitching was also stitched in the rayon thread with 100% Polyester bobbin thread. Fabric seamed to leather used 100% polyester for both top and bobbin threading
Very informative. Thank you.
I would look for leather in second hand stores and in my own stash of handbags that I no longer use. Great tutorial!! Thank you
Awesome idea!, thanks for sharing it!
Excellent article! As always, the articles you publish give me inspiration and help me to incorporate you techniques.
May give leather a try after reading your excellent instructions. Thanks again for a well written article.
What machines would you recommend for leather embroidery?
Stabilizing and needle choice are the main keys to success when doing machine embroidery on leather, but we would be wary of trying this on a very basic embroidery machine. Although a top of the line embroidery machine is not a must, it is always a plus. The machine’s motor must be sturdy enough to handle heavier materials. As with most things in machine embroidery, we suggest you do a test before starting a design on an expensive piece of leather
Thank you for a great explanation. I was looking online for a similar idea and really appreciate it
I appriciate your hardwork to write the content on leather machinery. it’s very informative post.