Machine Embroidery FAQs with Patti Lee
Machine Embroidery FAQs
from Patti Lee & Sue Hausmann
The machine embroidery topic is the consistent winner for most questions asked at Sulky.
Patti Lee, Sulky VP of Consumer Relations, answers most of these FAQs, via info@sulky.com and through our Ask the Expert portal at sulky.com. Patti compiled the FAQs from her years at the computer screen and on the phone, helping folks like you navigate Sulky products and projects. Read on to discover answers to questions you might have, too, and start off National Embroidery Month with lots of troubleshooting tips!
STABILIZER
What’s the Right Stabilizer to Use?
The “right” stabilizer depends on the fabric and the quality and density of the chosen design. The “rule of thumb” (and that’s used very loosely) is use a tear-away for a woven, and permanent cut-away for a knit or stretch fabric. A wonderful book written in recipe-format is now available digitally: Sew, Craft, Quilt and Embroider Confidently with Sulky Stabilizers. Now you can own this content on any device for easy reference anytime. It’s an absolutely fabulous reference tool to help you choose the right stabilizer for your projects.
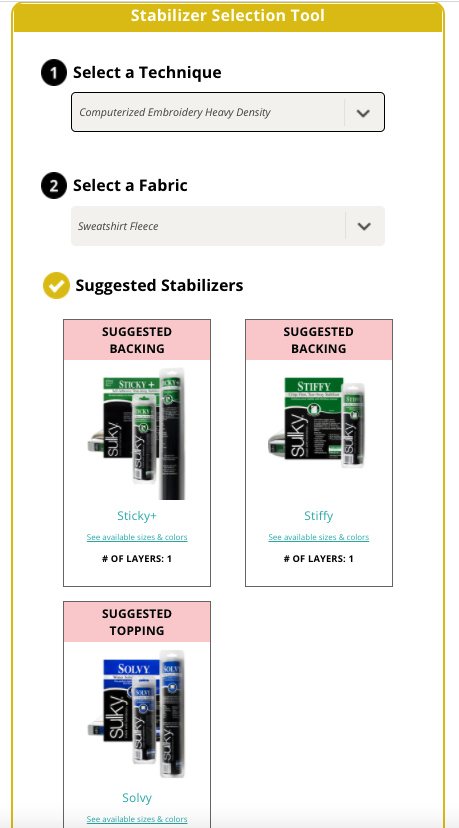
The Stabilizer Selection Tool at sulky.com is also a wonderful resource. Simply choose the fabric and technique you’re using and the tool recommends a stabilizer (sometimes more than one) to try.
How Much Stabilizer Should I Use?
 If in doubt, Patti recommends to use a little more than you think. You can always remove an excess layer of tear-away, but puckers are difficult, if not impossible, to remove. At the first sign of any puckering or drawing up, slide (a.k.a float) another piece of tear-away under the project. Another alternative is to always do a test stitch-out. (Excellent advice, but we don’t always do that, do we?)
Sue Hausmann, Sulky expert and host of America Sews, says, “The answer is easy! Use enough to support the design so there is no puckering. Knowing what and how much to use is the real question! There will be times one layer of Tear-Easy will support your design on a woven fabric. However, many fabrics, especially stretch fabrics, require a cut-away to “change the hand” of the fabric for embroidery and to support the finished design through washing and wearing.”
To Hoop or Not to Hoop?
This is a big misnomer, because of course, you always must use a hoop. But “hoopless” embroidery is when you use the hoop as the base to attach an “unhoopable” via a sticky stabilizer or stabilizer combined with temporary spray adhesive. Hoopless embroidery opens a world of possibilities to embroider on many things that once seemed impossible.
If working with a napped or textured fabric, do not try to fit it within the hoop rings. It could result in “hoop burn,” when the fabric is permanently marred by the hoop. Hooping this type of fabric could also result in a less-than-secure hooping, producing puckers or even folds in the fabric during the stitchout. Instead, attach it to the stabilizer already in the hoop either by using Sulky Sticky+ or a cut- or tear-away variety combined with Sulky KK 2000™ Temporary Spray Adhesive.
When working with many readymade items, a hoop is often impossible to use. If adding a monogram to a collar, the shirt likely won’t fit in the hoop. Instead, hoop the stabilizer only, and then secure the collar to the stabilizer using KK 2000, Sticky+ and/or basting in the hoop before embroidery begins. If embroidering an Embroider Buddy, never try to hoop the stuffed animal. Instead, hoop the stabilizer, and then secure the animal belly (or other area) after the stabilizer is securely in the hoop.
THREAD FAQs
Should I use Rayon or Polyester Thread for Machine Embroidery?
This is a never-ending debate, right up there with the direction the toilet paper roll should flow. Often thread content depends on the project use. Patti uses Sulky Rayon almost exclusively for machine embroidery. She loves the luster, softness and the drape of rayon. But there are times when polyester (Sulky Poly Deco™) is a better choice; for example, for items that might need bleach or outdoor projects that are subjected to loads of sunlight.
If making a gift for someone who has no laundry-sense, you may feel polyester is a safer choice for them. There is more stretch to polyester, so you can get more of the occasional thread pull-up with it. It’s also a synthetic thread, rather than obtained from a natural source. (Rayon is created from only the highest quality from Enka® tree-farms grown in Europe.)
Sue Says: “I’m often asked which to use: Sulky Rayon or Poly Deco. My preference is rayon for most embroidery because it has such a beautiful sheen, and I have found it very durable through washing and wearing for my garments and projects. However, when stitching children’s wear, bathing suits and other items that will receive “rough and tumble” treatment, I use Sulky Poly Deco Thread.
Does Thread Weight Matter?
Thread weight matters a great deal in machine embroidery. Virtually all designs are digitized for 40 wt. thread. However, more “hybrid” designs are emerging for lighter and heavier thread mixed together, which creates fun effects. Sulky has designs that are digitized for heavier 30 wt. Cotton and very heavy 12 wt. Cotton and 100% Acrylic Filaine. More rare, are designs for 50 wt. (lighter) Cottons. Be sure to read the design specifications for any design you purchase. Using lightweight thread can result in open (inadequately filled) areas in a design, and conversely using a heavyweight thread can result in breakage of both thread and needles. You’re asking a different thread weight to fit into the space digitized for a 40 wt. thread – sometimes it works just fine, and other times it’s disastrous. It’s also critically important to use the correct type and size needle for these designs.
Why is my Thread Breaking?
There are so many variables, now, and more every day, with all the different machines, stabilizers, add-on products, hoop issues and more. Generally speaking, it’s either the needle (too small – shredding at the needle) and/or wrong type of needle or a damaged needle, or too tight of a top tension. Other things to consider: The quality of a design, appropriate design choice, proper stabilization, burrs on bobbins, rough (nicked) throat plate, position of spool, fusible webs (a biggy!), and much more — and often a combo of these things. Contact us anytime at info@sulky.com to help decipher where to begin troubleshooting when this happens.
Sue Says: “As the needle goes up and down in the machine, the actual place in the thread spool being stitched has been in and out of the machine, the fabric, and around the hook many times. Because of this, if the hole poked by the needle is not large enough, the thread can “rub” on the edges of the fabric causing “thread shredding” and ultimately breakage.
When I experience more than one thread break in an embroidery, I stop, change my needle, brush out the bobbin area and remove any lint from the top thread path. Then I install a new needle – usually one size larger – and rethread the needle and bobbin.
A tip from an America Sews quilting guest years ago has saved me a great deal of time and frustration. Before putting the needle into your embroidery/sewing machine, test the needle size by threading the thread you are planning to use for embroidery (or sewing) into the needle eye. Then grasp the thread about 5” from the needle on both sides of the needle. Raise and lower the thread ends so the needle slides up and down the thread. If it does not slide freely, the eye in the needle is too small. Go up one needle size and try the test again.”
NEEDLE FAQs
How Do I Choose the Right Needle for the Thread I’m Using?
Generally, choose the needle type based on the fabric you’ve chosen. Choose the needle size based on the thread weight. There are other specialty needles available today, too, such as non-stick needles, Microtex, metallic, jersey (stretch), and leather needles. Patti recommends high-quality Organ® brand needles, which were primarily only available in Europe before Sulky became the North American distributor of Organ Eco-Packs.
Sue Says “Insert a new sewing machine needle and brush the lint out of your machine often! A good rule of thumb is to replace the needle after one or two projects. My rule is “any time you are having a “glitch” change the needle!
For most embellishment and embroidery, I use a size 90/14 Top Stitch or 90/14 Embroidery Needle. These needles have a larger and longer eye for specialty threads. They poke a rather large hole so the thread doesn’t rub on the fabric as it goes in and out, which can cause thread shredding and breaking.
The larger the number, the “fatter” the needle and the deeper the groove in the front of the needle to protect the thread. I may use a smaller needle for a finer weight thread and/or a smaller hole in the fabric. Knits also sometimes require a Stretch or Ballpoint needle, size 75 or 90, to avoid holes or runs in the fabric. Stretch needles also have a deeper “scarf” at the back of the needle to get closer to the hook as the stitch is formed and will often solve skipped stitch issues.
There may be times you will use a smaller size needle with lighter weight threads, or finer fabrics. However, if you have any issues with thread breakage or shredding change to a larger size needle.
Needle types have different points for specific techniques and fabrics. You can’t go wrong using the needle type specified on the package such as: embroidery, quilting, topstitching, stretch and more. Purchase the quality needles recommended for your sewing and embroidery machine.”
What’s the Difference Between a Top Stitch and Metallic Needle?
Amazingly, nothing. They are virtually the exact same needle. Metallic needles became popular once people began sewing with metallic threads. Top Stitch and metallic 90/14 needles have a longer, larger eye, which is enormously helpful to prevent breakage. There are 80/12 metallic and top stitch needles, too, and some machines do well with these for metallics. But by and large, a 90/14 is the choice that works most successfully on the majority of machines using metallic or heavier threads.
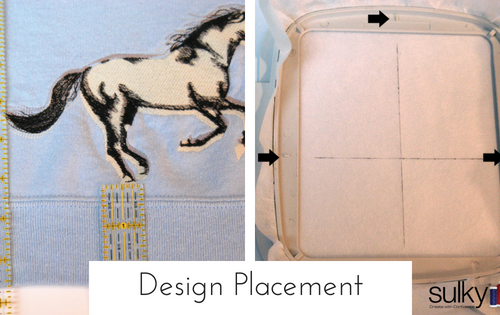
DESIGN SIZE FAQs
How Do I Make an Embroidery Size Smaller (or larger) to Fit My Hoop?
Embroidery machines have built-in software that allows minimal editing of designs, such as rotating, combining designs and resizing. In general, most machines allow you to resize a design down or up 20%. Anything beyond that requires additional software, such as Creative Drawings or Embrilliance to name a few, to resize.
Sue Says: “Most embroidery machines and embroidery software offer two ways to change the size of a design: scaling and resizing.
Scaling designs makes the design larger or smaller but does not change the stitch count of the design. A “rule of thumb” is to use finer thread, such as Sulky 60 wt. PolyLite™, when making a design smaller and a heavier thread, such as Sulky 30 wt. Cotton, when making a design larger. Always stitch a test design after scaling!
Resizing designs changes the stitch count. Consult your machine manual when resizing designs. There is a suggested limit on percentage of resizing for best results. Always stitch a test design to ensure desired results.”
After resizing and/or scaling ensure there’s still adequate coverage from the thread. Conversely, make sure there’s adequate room for the thread to fit within a certain area.


7 Comments
Mary Wright
Thank you for this invaluable information I found it very helpful as I am about to try some embroidery work. Mary
Patti Lee
So glad you find it helpful, Mary. That was our goal. Sue will be thrilled.
KIM M HARRINGTON
Excellent tips! I have followed Sue for a super long time, and I use lots of Sulky products in my studio, so I usually do get the best results. Thank you both for all you do to help people have fun with their sewing machines!
Patti Lee
Thanks Kim. It is our pleasure. And Sue never stops helping even in retirement.
kaw6260
Patty and Sue, Thank You so much for this information. It is very helpful. You both provide an exceptional learning experience in all that you do. Thank You!!!
Mary Yetman
Do you have a software you recommend to digitize my own patterns?
Ellen March
Hi Mary,
There are so many software programs on the market. I suggest you start by researching the one that’s most compatible with your machine. Check your machine brand website to see what types of software they offer (many have free trials so you can try them and see how user-friendly they are before purchasing). There are also independent software companies, such as Creative Drawings and Embrilliance. Both of those also offer free trials. Personally, I have used Premiere+, Embrilliance and Creative Drawings and I find that they all have great features. It really comes down to what you’re most comfortable using and what your budget is.