In-the-Hoop Baby Bib
Now that you have some great tips on doing machine embroidery on flannel, let’s try it out on this cute in-the-hoop baby bib project! This is a great little gift for Christmas or a baby shower. Simply change the colors up to fit the decor (and gender) of the little one you’re making this bib for.

Skill Level: Embroidery – Beginner
Bib Stitching – Not Applicable – since it is stitched automatically In-The-Hoop (Bonus!)
Decorative Stitching is optional and makes this project Beginner-to-Intermediate depending on your chosen stitch.
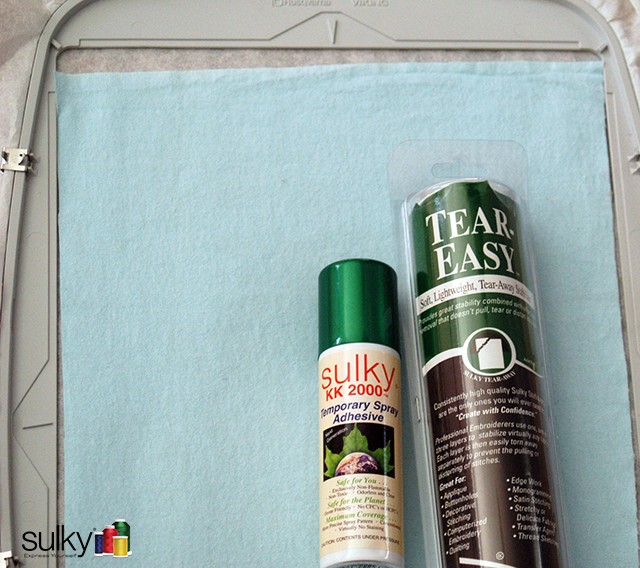
Supplies:
1/3 yard of cotton flannel
Sulky® Tear-Easy™ Stabilizer
Sulky KK 2000™ Temporary Spray Adhesive
Sulky 40 wt. Rayon Thread – colors of choice
90/14 Topstitch Organ Needle
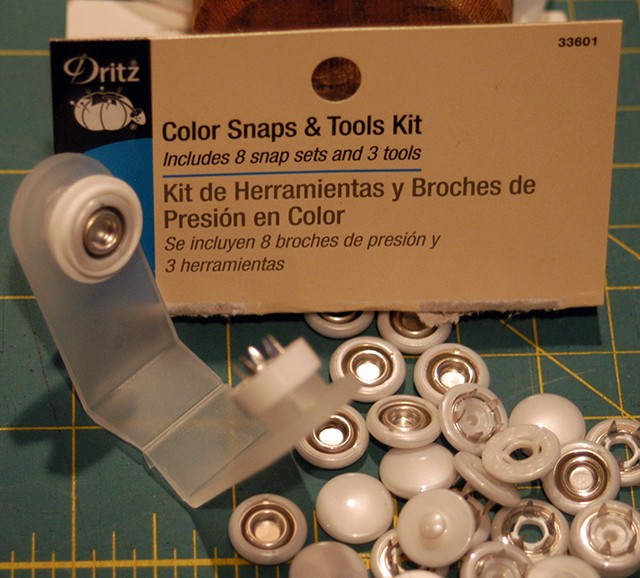
1 Gripper Snap set
Preparation:
Pre-wash and dry the flannel fabric. This allows any shrinkage to occur.
Cut the fabric into two rectangles – each minimum size 9-½” by 13”.
Securely hoop Sulky Tear-Easy™ in a machine embroidery hoop no smaller than 360 x 200mm.
Mark the right side of the center of the rectangle fabric piece.
Spray the wrong side of one flannel piece. Press the flannel firmly onto the hooped stabilizer, smoothing out any wrinkles as it is placed.
Match the centers of fabric piece and hoop centers as closely as possible.
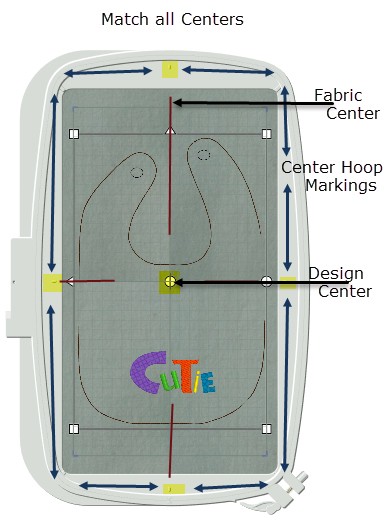
Centers do not have to be exact! The suggested piece size affords some marginal errors. Do your best to keep centers fairly close to each other.
Embroider the Project:
Thread the machine with the color chosen for the letter “C”. The first step will not show in the final project in any way.
Color Stop 1:
This bastes a box around the entire bib, anchoring the flannel to the hooped stabilizer. This step also allows another chance to check that the flannel lays totally flat and wrinkle free. If a “bubble” seems to be occurring, gently lift the flannel from the stabilizer and readjust.
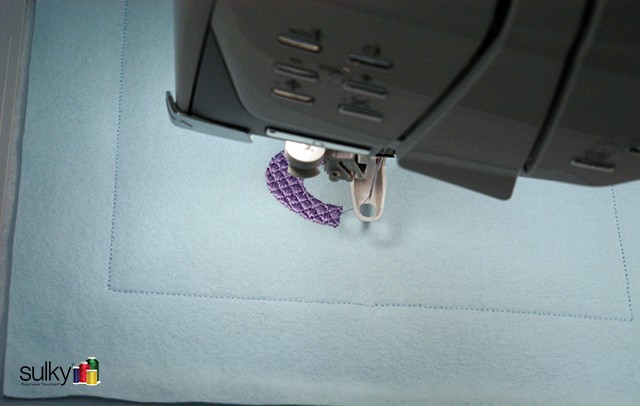
Helpful Hint: Embroidery machines incorporate a “Start/Stop” button that automatically runs the machine through individual color stops. Operators often feel that this button must be used for the embroidery process. However, individual color stops can always by stitched by using the foot pedal. Oftentimes, it is beneficial to use the foot pedal during the basting process of any design, whether that step is digitized into a design, such as Color Stop 1, or when incorporating this function directly from the machine. It is easier to “Start/Stop” the stitching with a foot pedal affording total control of achieving a “wrinkle free” outcome.
Note: The basting stitches will be cut away when the bib is complete, so you won’t have to “unstitch” them.
Color Stop 2: stitches the letter “C”
Color Stop 3: stitches the letter “u”
Color Stop 4: stitches the letter “T”
Color Stop 5: stitches the letter “i”
Color Stop 6: stitches the letter “E”
Before stitching Color Stop 7, spray the right side of the remaining flannel piece. Cover the embroidered fabric with the second flannel piece, with the sprayed side facing the embroidery. Outer panel edges do not need to match exactly, but they should be in fair proximity of each other.

Once again, keep the top panel as wrinkle free as possible. Monitor the stitching process of Color Stop 7, smoothing the top panel as it is stitched in place.
Color Stop 7: Stitches the bib together much like stitching two pieces of fabric cut from a paper pattern guided by a required seam allowance. The difference? Considering the seam allowance stitching is a programmed design, completed directly “in-the-hoop”. Every curve is perfect with no effort, without any high skill level required to produce a truly professional look!!
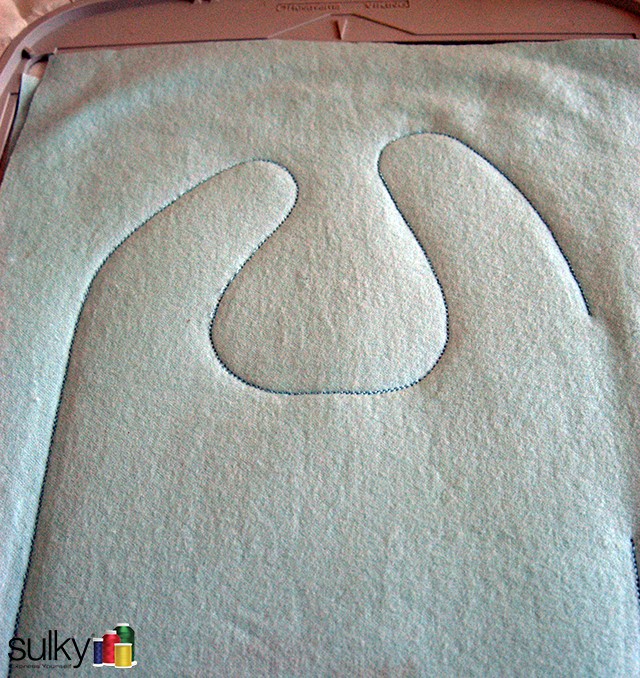
Color Stop 8: DO NOT STITCH this color. This final color is only programed into the design to afford a visual of snap placement. This “marking” is much like one found on a paper pattern.
Finishing Touches:
Tear-Easy lives up to its name by being exceptionally easy to remove from the outer perimeters of any stitching area. For this particular project, it seemed prudent to remove the stabilizer in several stages:
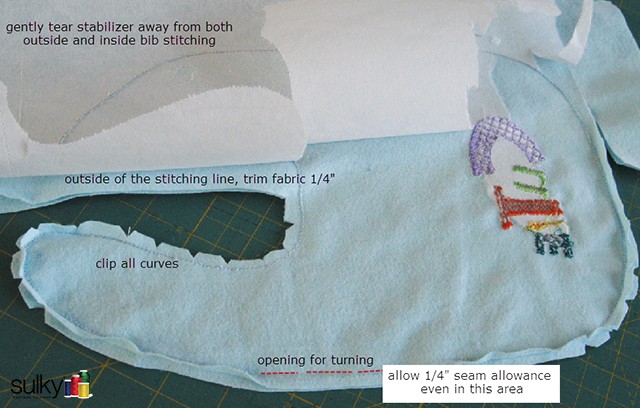
- Begin by removing the bulk of the stabilizer outside the basting box by gently tearing it away.
- Cut the seam allowance around the entire bib which is 1/4” outside of the bib stitching line (which was Color Stop 7).
- Gently tear the stabilizer along the bib stitching line (1/4” seam allowance)
- And, finally, remove the Tear-Easy from inside the bib area. Press seam allowance by turning up one side of the seam allowance steaming it flat.
Turn the bib right side out through the side opening: A Ball Point Bodkin is helpful in “pushing” the fabric inside the bib out, into the bib’s proper shape.
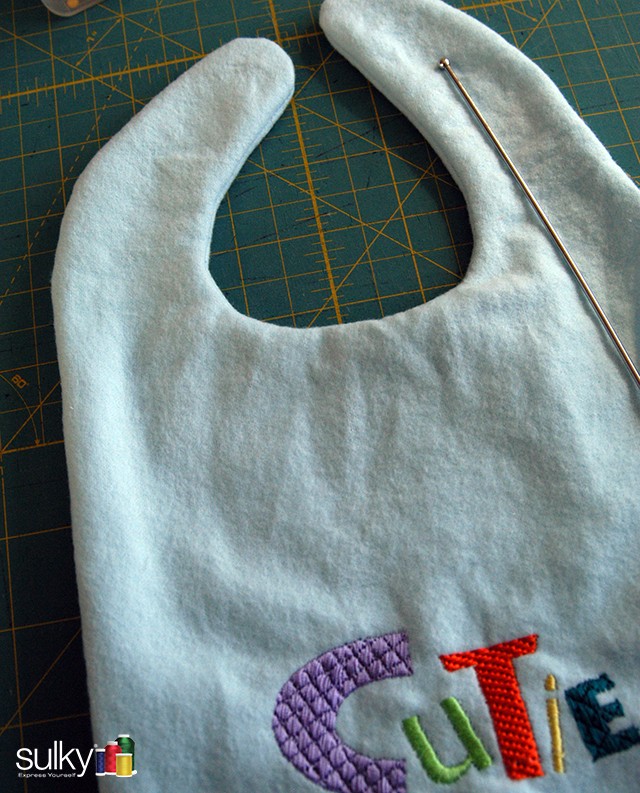
Crease the outer seam. Use a pin to pull the seam “out” if needed, rolling it towards the wrong side.
Helpful Hint: Cover the ironing board with a thick terry towel when steaming napped fabrics or embroidered designs. The thickness of the terry towel helps to preserve the depth of designs and naps.
Close the side opening by hand stitching. Add a snap on each curved “strap” using the embroidery design as a visual guide placement
and the in-the-hoop baby bib is complete!
However, to take it one step further…
Stitch a decorative design along the edges! Doing so not only adds interest to the bib, but it also serves to hold outer edges in place during the multiple washings which are bound to occur with the usage of this “favorite bib”!!

Download the FREE embroidery design here: Baby Bib
Note: Once you download the free design, you will have to ‘unzip’ the folder. Your computer should walk your through the process, but here is a link to a tutorial on ‘unzipping folders’ if you need it.
Happy Sewing!

Your link is broken on the PDF button.
Probably a glitch in the plug-in, I will let the Internet Fairy Gnomes know so they can fix it. Thanks for letting me know!
I would like this bib design and the link won’t work!
Thanks
So cute – can’t wait to try this one
Thank you for this freebie design! I make a lot of bibs with embroidery and applique, but not many of them are in-the-hoop. I will enjoy making this one! It’s cute!
I can’t wait to see it! Please post a picture on our Facebook page or Instagram @sulkythreads
I’m on iPad, when I tape “here” I get really weird letters.
Can not find where to get the embroidery design. Did get the instructions.
Click on the word ‘babybib’ in the bottom of the blog post. It will automatically download the zipped file to your computer. Then unzip the file and get out the design format for your machine.
Hi I can not see a down load for the bib.. i would lobe to do this. Any help would be great! Just became a grand mom.
Oh my if it was any clearer… Thank you Have a great Thanksgiving…. ^j^
How did you complete the top stitch, with a sewing machine? How would i do it with my embroidery machine?
Yes, the topstitching is a decorative stitch on your regular sewing machine. It adds the perfect finishing touch.
This is awesome! I hate trying to sew bibs (not ITH) They are so tiny and have such tight curves. Thank you!
It looks like the design to stitch is in the BabyBib folder. Do I need something from the _MACOSX BabyBib folder?
Thank you.
If you’re still having trouble with this issue, please email patti.lee@sulky.com.
what size hoop do you need for the bib..
A hoop no smaller than 360x200mm
Where is the free download?
Robin, scroll all the way down on the post and you will find the link to the design.