
This series is written by guest blogger, Pamela Cox. Pamela is an expert embroiderer, designer, digitizer and all around wonderful girl! We are so happy to have her contributing to the Sulky Blog!
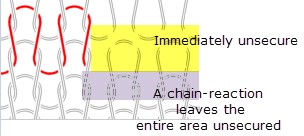
We all have sweaters hiding in our closets which are still very near and dear to our hearts. Although we cannot part with them, we also would not be caught dead actually wearing them!!!! Let’s think of a way to make these memorable sweaters into practical items bringing comfort to our busy lives. For success in stitching with knits, begin with a basic understanding about their construction. All knits, whether manufactured or hand-knitted, incorporate a series of interlocking loops. The locking loops stabilize any given area with each loop dependent upon its neighbors to remain intact.
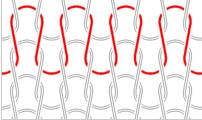
Cutting through any one loop breaks the interlocking system and compromises stability. Often times a “run” occurs when a knitted stitch is cut or “dropped”.
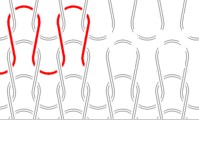
Left unchecked, an entire area can easily be compromised with the potential of unraveling the entire sweater!
So, let’s proceed with caution, but also with excitement about imagining what can be created!!
Our initial thought might be that knits and machine embroidery may not be a marriage made in heaven, considering knits stretch and display a surface texture allowing stitches to hide/sink in between the knitted loops. Machine embroidery requires a stable foundation demanding attention as it embellishes a fabric’s surface. Isn’t the saying that opposites attract?? Contrast, in the world of design, is essential. Fortunately for us, Sulky® provides a wealth of stabilizers to help bring our imaginations to reality.
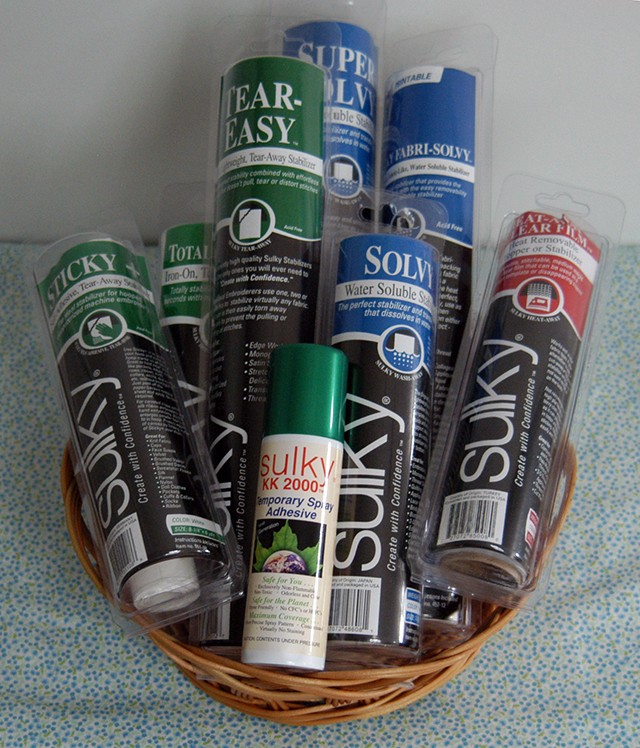
Fabrics which stretch should never be secured directly within a hoop’s frame. It is so easy to displace the evenness of the knitted pattern while preparing to make the surface “wrinkle free” as the hoop is tightened. Therefore, it is the foundation stabilizer which must be firmly secured in the required size hoop. As mentioned, there are several Sulky® stabilizers to choose from with no one of them being “right/wrong”.
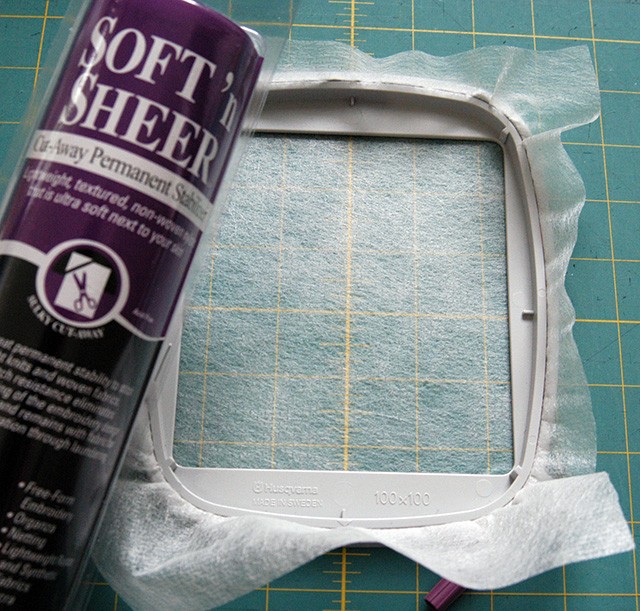
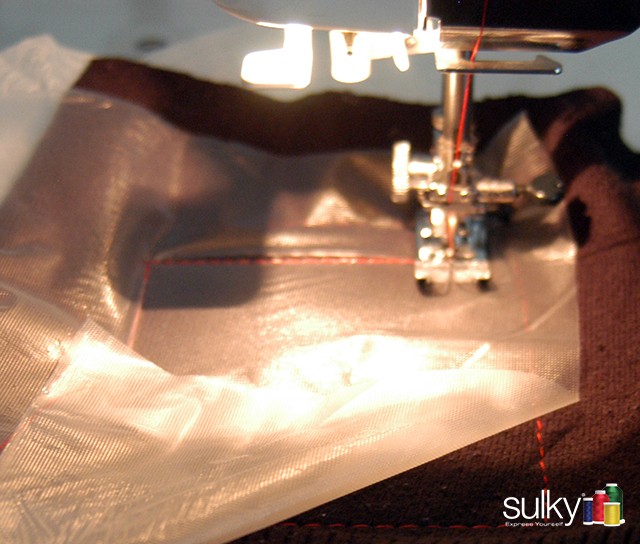
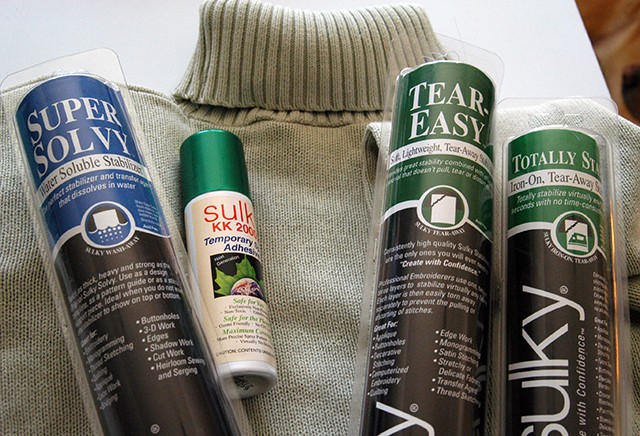
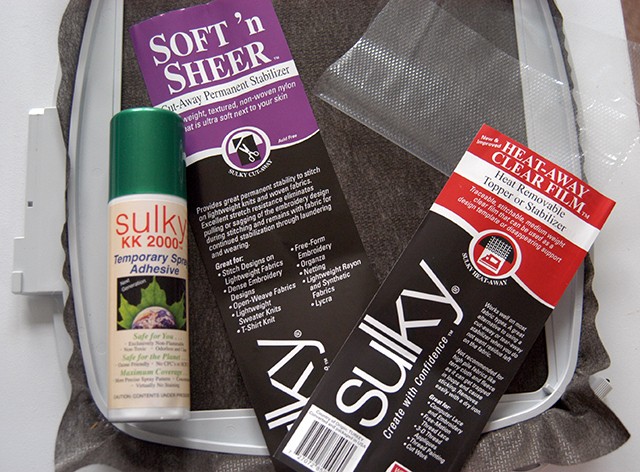
Soft ’n Sheer™ is a sheer, yet very strong, stable stabilizer. It will require the knit to be secured to it by spraying KK 2000™ Temporary Spray Adhesive to the back of the knit and pressing it firmly in place to the Soft ‘n Sheer. The knit is now secured to a hooped stabilizer.
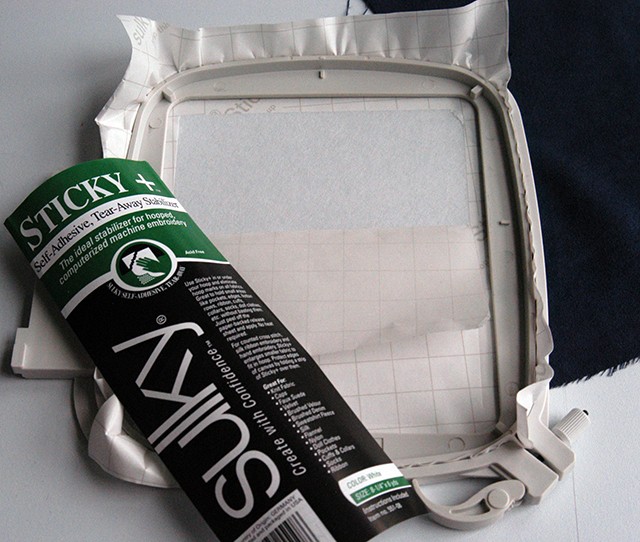 Sticky+™ – is a tear-away stabilizer with a sticky surface allowing the knit to be securely pressed into the hooped stabilizer yet can gently be pulled and torn-away from the wrong side of the knit.
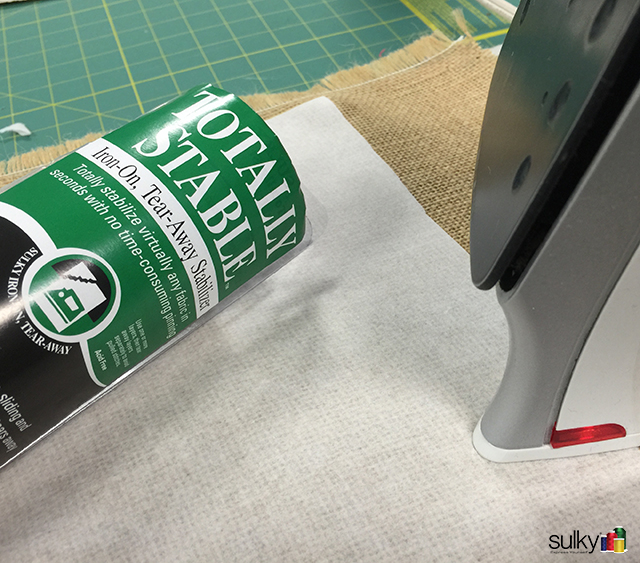 Totally Stable® – an iron-on, tear-away stabilizer that is perfect for knits and stretchy fabrics, since it “totally” stabilizes the knitted loops. Use it in conjunction with a cut-away or tear-away stabilizer.
Stitches tend to sink between the loops of a knit, which is wonderful for hems, but not so much for an embroidered design which is intended to show in its entirety. A “top stabilizer”, often referred to as a topper, is necessary.
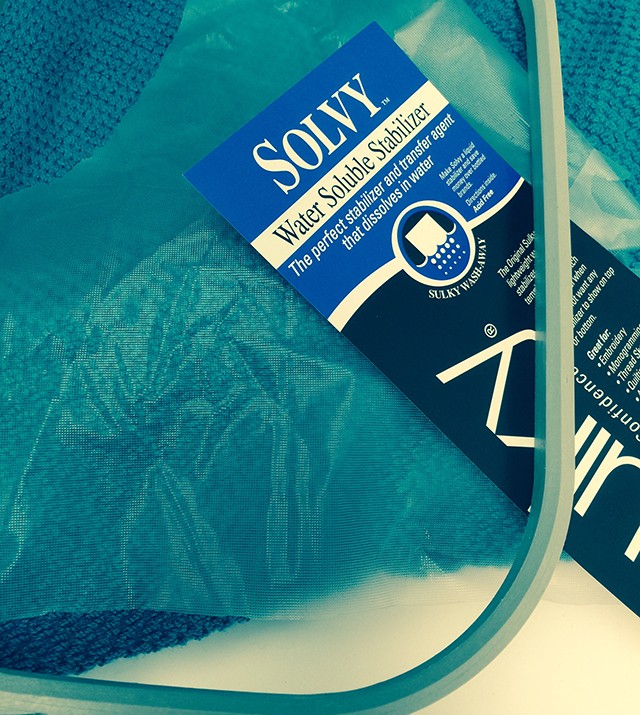 Once again, Sulky® offers two choices. Sulky® Solvy™ or Super-Solvy™ depending on the density of the embroidered design. Both weights of the film-type Solvy™ are able to be totally washed away, and often released with just a wet Q-Tip® or damp cloth.
 Sulky® Heat-Away Clear Film™ feels much like the wash-away topper but any residual left after gently tearing the excess is removed by touching a hot iron to the exposed stabilizer. Knits can never be “overly” secured. If the fabric is shifting during stitching, adjacent areas or outline stitches, will be distorted. You’ll hear people say “the registration is off” when they discuss this issue.
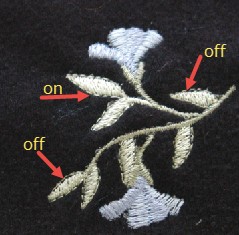
In other words, back up your “aces” and then back them up again. The foundation stabilizer needs to be “sticky” whether that be the actual stabilizer itself or by using KK 2000™ Temporary Spray Adhesive. Baste the fabric within the hoop’s frame and then baste again around the design area adding the top stabilizer, if your machine offers these functions. Stitch the basting with the foot control (if your machine allows) to maintain the ability of smoothing fabric/toppers as taut as possible. If the embroidery machine does not afford this function, basting can still be accomplished using a regular sewing machine. Slide the hooped stabilizer with the fabric sticky-tacked underneath the presser foot. Some machines may require that the foot be removed to allow enough space for the thickness of the hoop.
Use the frame as a guide and stitch all around the inside of the hoop. Place the topper and stitch around the design area. Mark the topper with a fabric pen to show embroidery area if in doubt.
When stitching on a knit fabric, have you ever encountered “loopy”, or skipped stitching? Changing to a Ball Point Needle solved the issue without any other machine adjustment….right? The same holds true with machine embroidery. There are embroidery needles manufactured specifically for knits. Their rounded point allows them to slide in between knitted loops as opposed to a sharp point of a regular embroidery needle which penetrates and
may cut adjacent fibers.
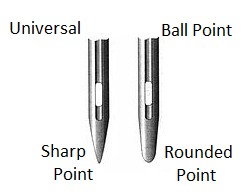
“Ball Point Embroidery Needles”, are available under the brand name, Organ. However, Schmetz “gold embroidery needles” are advertised as displaying a “slightly rounded point” as well. Schmetz www.schmetzneedles.com has several different kinds of Ball Point Needles (also called Jersey Needles). There may be many more product names available, these just happen to be the two that I have personally used.
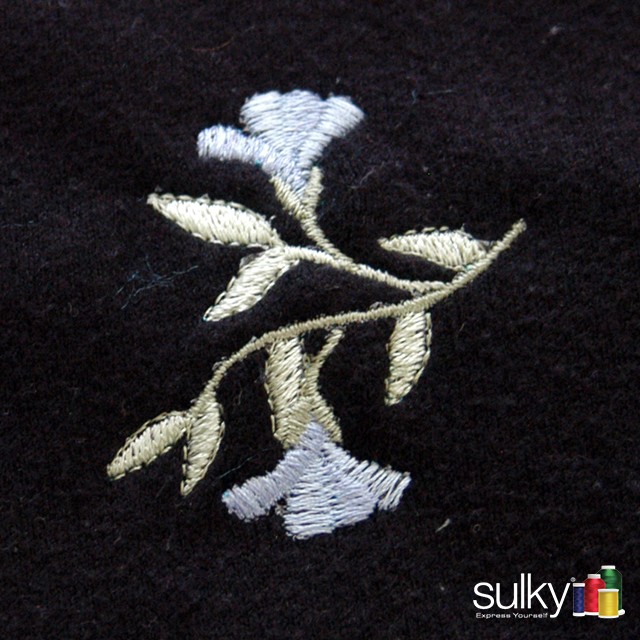
Let’s turn our thoughts to the actual embroidery design. Knowing that “sewing stitches” often disappear into a knitted surface, it seems best to avoid line-designs (red-work). Applique or filled designs are better choices since both already “sit on top of any fabric surface”. Adding a topper to the knit equation, insures successful embroidery for this texture as well.
One final suggestion is to reduce the speed of the embroidery machine which will reduce friction.
Time to Get Serious and Stitch a few Samples!
Green Knit Turtleneck:
Fabric: A heavier cotton knit which was distorted by improper washing – my bad!
Stabilizers: Sulky Tear-Easy™
Sulky Totally Stable®
Sulky Super-Solvy™
Sulky KK 2000™ Temporary Spray Adhesive
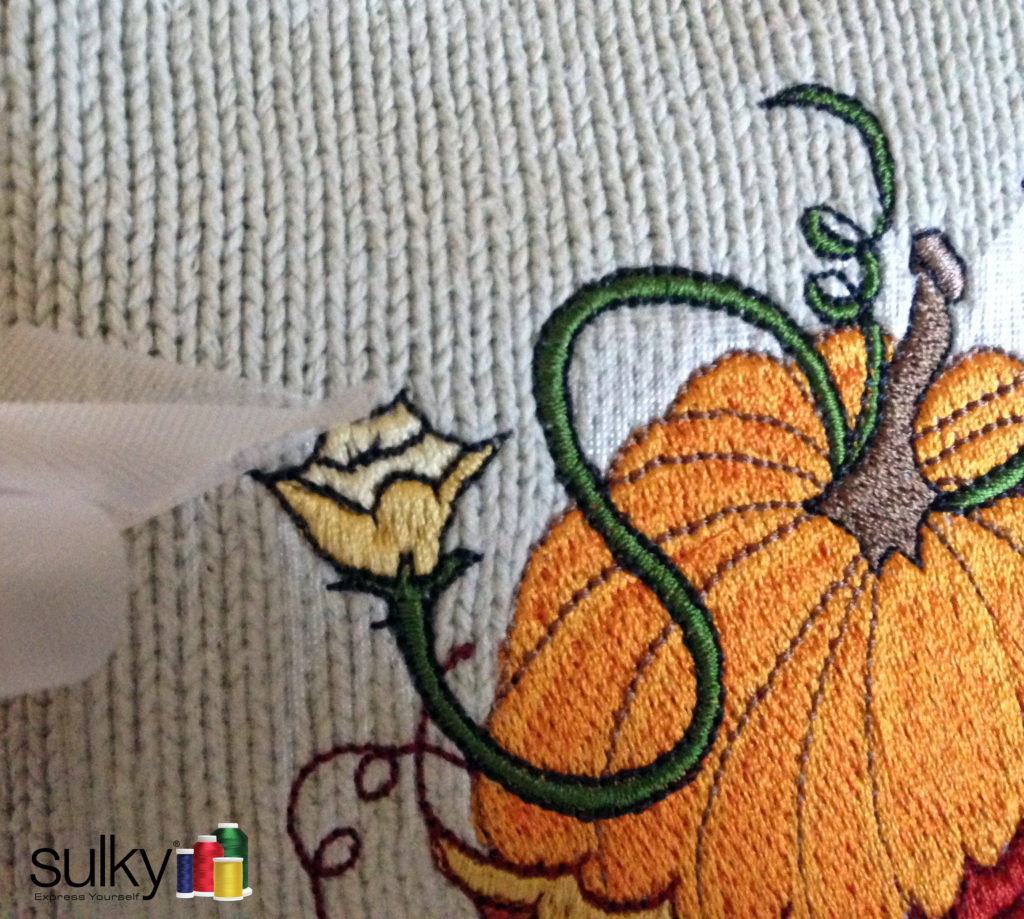
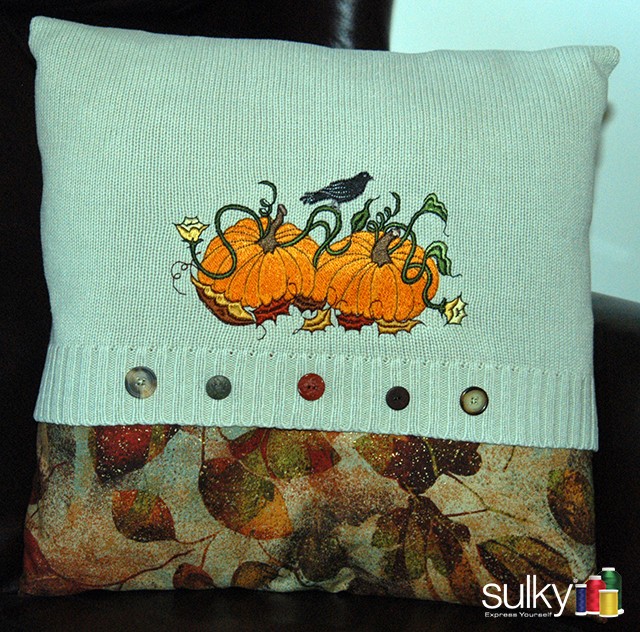
Embroidery Design: Twin Pumpkin-1063 available on the Sulky Embroidery Club website www.sulkyembclub.com
Thread: Sulky® 40 wt. Rayon
Needles: 90/14 Ball Point Embroidery
Steps:
1. Cut a piece of Totally Stable® slightly larger than the pumpkin design: Design size is 4” x 7”. Stabilizer was cut 5”x 8”
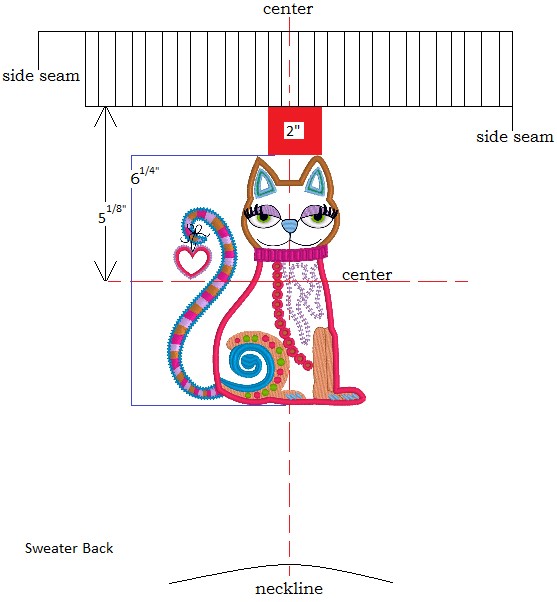
2. Mark the sweater for design placement:
a. Centered on front or back sweater panel
b. Measure up from the top of the ribbing, half the design’s height, 2” and add 1/8” as a buffer
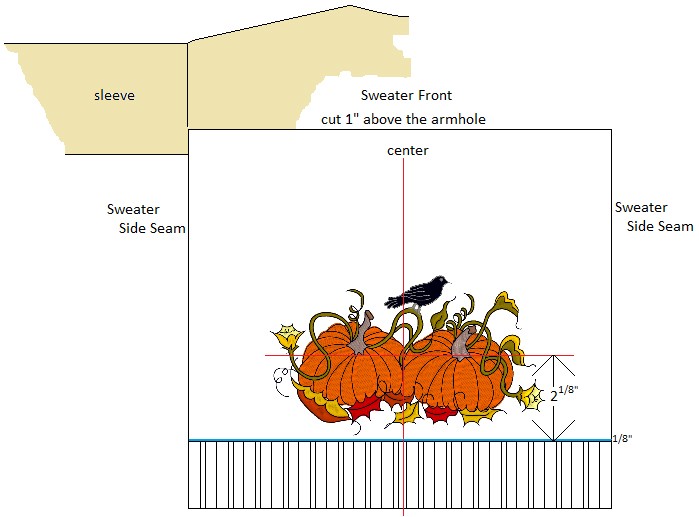
c. Press Totally Stable® to the wrong side of the knit, matching the center of the cut stabilizer to the design center. The stabilizer’s shiny, smooth side faces knit, with the rough side facing the iron. Use a dry, warm iron to press in place.
d. Allow fabric to completely cool before handling.
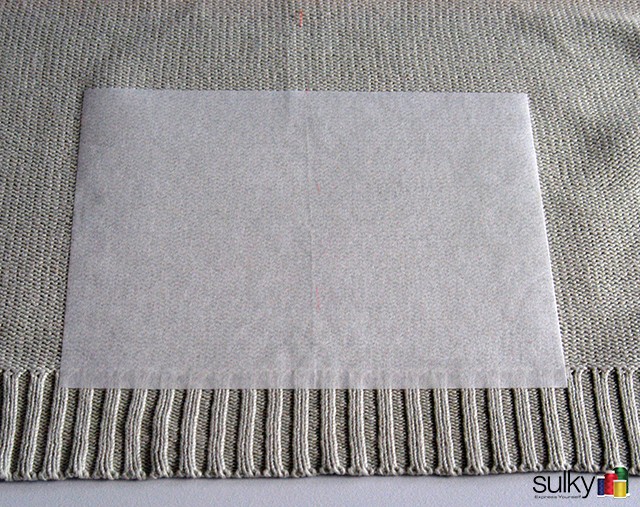
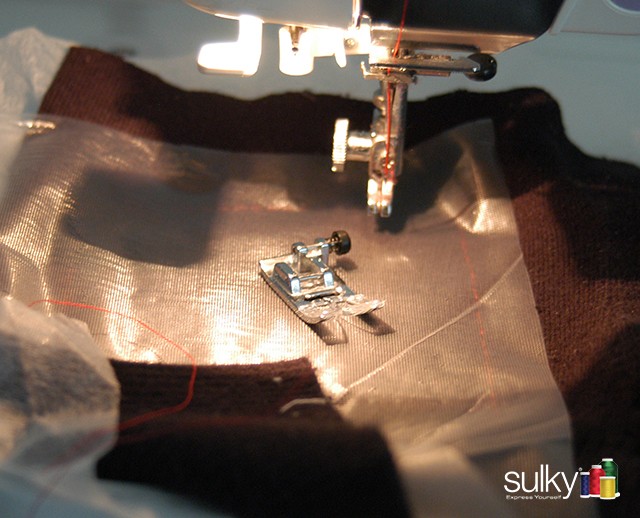
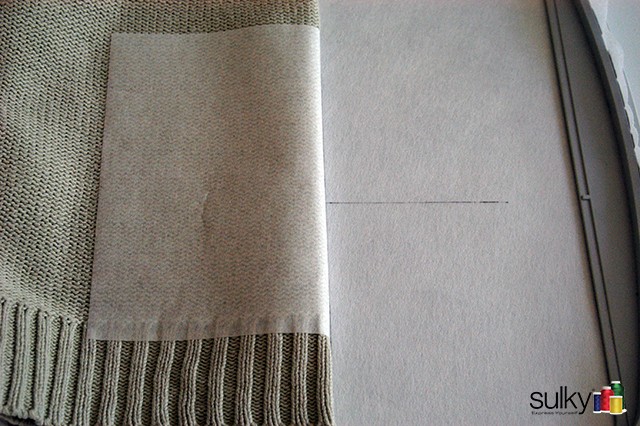
3. Securely hoop a piece of Tear-Easy™. Draw center lines directly on the stabilizer with a fabric-safe pen, and lightly spray with KK 2000.
4. Match the design center to the hoop center (which may not be the true center of your hoop – watch the actual hoop marks).
5. Baste within the hoop’s frame.
6. Add a top stabilizer to the fabric surface and baste/fix around the design area.
7. Embroider the design.
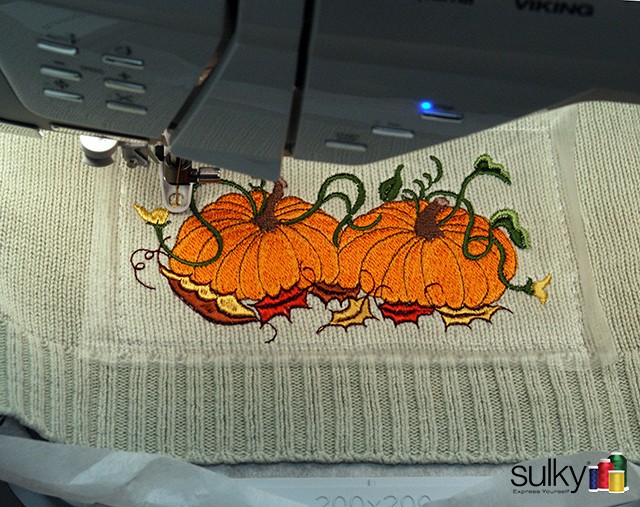
8. Once all the stitching is completed, remove the fabric from the hoop and trim any remaining jump-stitches from the front surface of the embroidery. Remove basting: Always remove from the foundation stabilizer side, to ensure no knitted loops are accidentally cut.
9. Gently tear the top stabilizer from the project.
10. Gently remove the tear-away stabilizer on the back. Lay the knit face down on a hard, flat surface. Keep one hand firmly on the knit and gently lift up on the fused stabilizer. It is very easy to lift and tear from the design.
How would this sample look if made into a throw pillow?? Add a contrasting fabric to the bottom third of the pillow to offset the sweater’s ribbing. Accent with interesting buttons and a soft, comfortable, seasonal throw pillow has been created.
Black Cardigan Sweater:
Fabric: A fairly light-weight, store-bought, cardigan knit which has seen better days
Stabilizers: Sulky Soft ‘n Sheer (sprayed with KK 2000™ Temporary Spray Adhesive – And I used the Black Soft ‘n Sheer for my project) and Sulky Heat-Away Clear Film
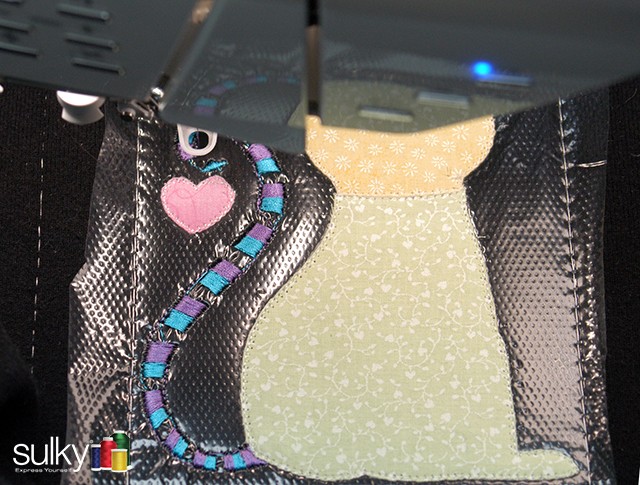
Embroidery Design: Crazy Cat – 832 available on the Sulky Embroidery Club website www.sulkyembclub.com
Thread: Sulky® 40 wt. Rayon
Needles: 90/14 Ball Point Embroidery
Steps:
1. Mark the embroidery placement:
The back was divided in half designating the sweater’s bottom ribbing as the top edge. Divide the design’s height in half (3-1/8”) and add 2” (a final project was in mind, and an allowance for cuffing the ribbing is included). The horizontal center was marked at 5-1/8” from the bottom of the ribbing.
2. Soft ‘n Sheer stabilizer was sprayed with KK 2000™ Temporary Spray adhesive and securely hooped in a 200mm square frame
3. Design and hoop centers were matched, pressing the knit firmly onto the adhesive surface. Stabilizing a knit cannot be stressed enough. In other words, if we were stitching on a woven fabric, simply pressing the woven surface to the sprayed surface would suffice; and then go ahead and embroider. However, when embroidering on a very stretchy knit base, additional stabilizing reinforcements are always a prerequisite!!!
4. Baste the fabric inside the hoop.
5. Machine fix the top stabilizer in place (in this case Heat-Away).
6. Stitch out the design as required, knowing that when trimming the applique fabric, the top stabilizer will in effect be a buffer for not cutting into the nap of the sweater.
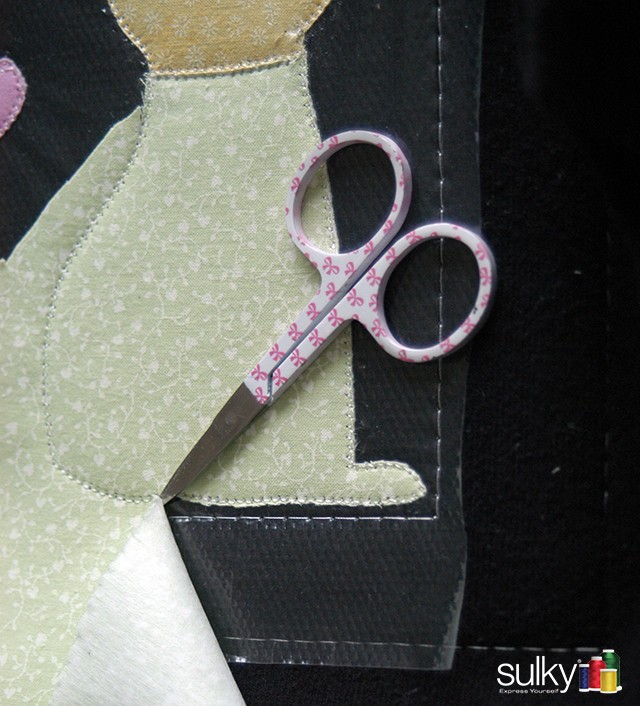
7. Once stitching is complete, remove all excess stabilizers. The top Heat-Away stabilizer is easy to pull away from the design. The tacky, adhesive sprayed Soft n’ Sheer easily pulls away from the knit, although it will need to be scissor trimmed around the design.
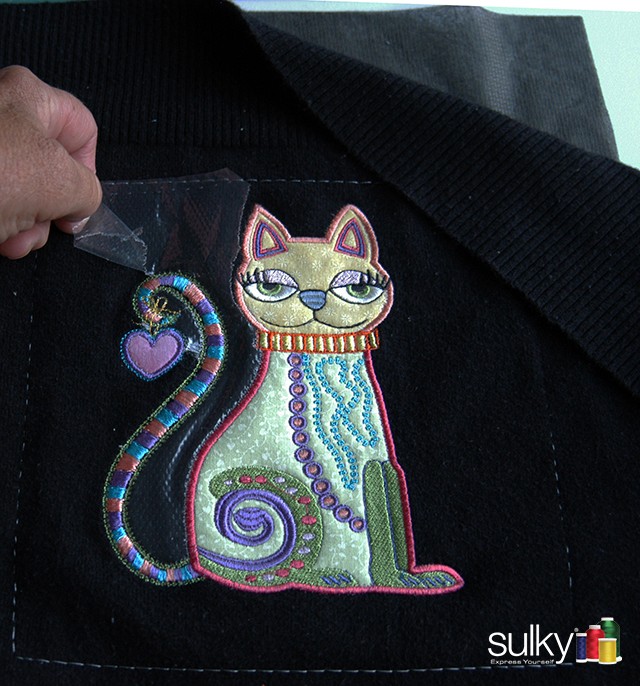
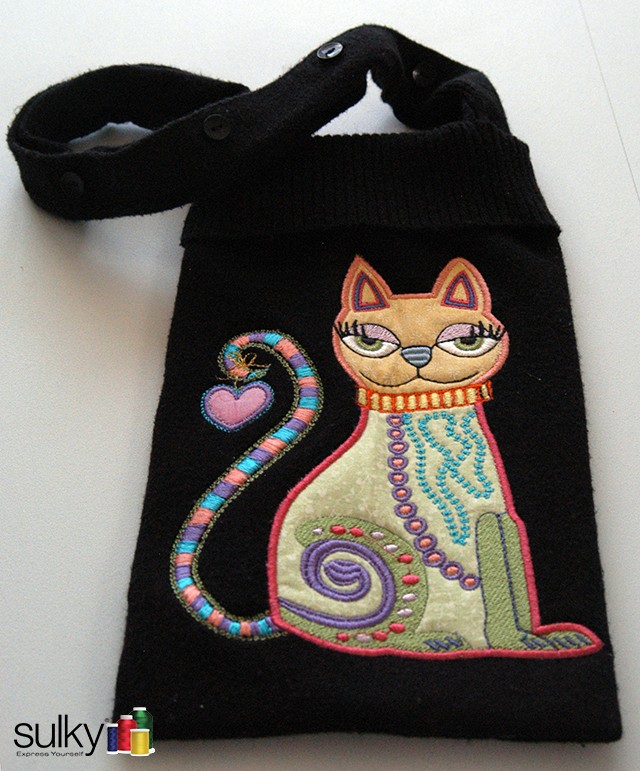
Can’t you picture this adorable applique as a mini purse? Keep the focus on the design by narrowly framing it. A cotton lining will prevent the knit from stretching as it holds valuable items. Use the cardigan’s button-front as the strap since it already offers stability with the grosgrain ribbon backing to the button and button-hole sides – not to mention an easy-peasy way to turn a narrow strap!!! Right??
Let’s Break a Few Rules!!
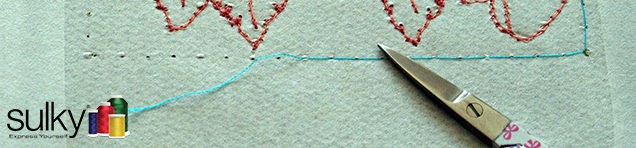
I must admit that I enjoy pushing the boundaries in machine embroidery, so let’s experiment. Although there are many wonderful applications for single-line coverage in embroidery, this type of line design may not be quite as effective on a knit considering all stitches seem to sink into the looped texture.
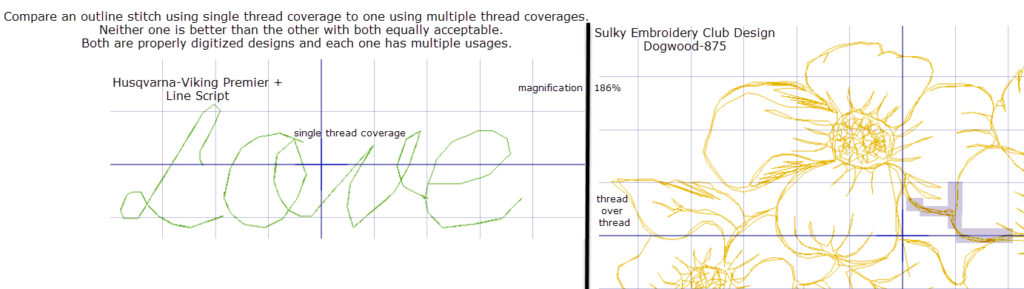
However, if the line design has been digitized to have multiple thread layers to define the line plus we add to the equation the use of a heavier thread……the possibilities of success now become apparent.
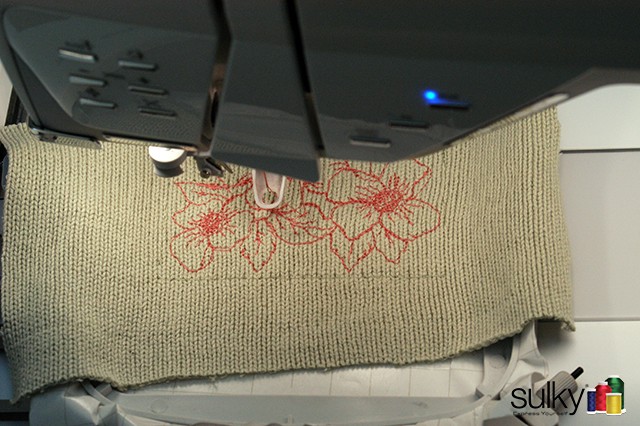
Fabric: A heavier, green, cotton knit from the turtleneck sweater
Stabilizer: Sticky +…period….no topper….we are breaking rules, right?
Design: Dogwood-875 available on the Sulky Embroidery Club website
Thread: Sulky® 30 wt cotton
Needle: 90/14 Ball-point embroidery
Steps:
1. Truly experimenting as I write, I simply cut a 4”x 6” piece of the green turtleneck sweater knowing that the design was 3” x 4-1/4”.
2. Sticky+ was securely hooped with the paper side facing up. This side was then gently scored with a pin within the hoop’s frame and the paper removed.
3. The knitted fabric was firmly pressed onto the sticky surface making sure the knitted rows were straight. No topper stabilizer was added.
4. The machine was slowed down to it slowest speed and the“experiment” was set in motion.
5. When stitching was completed, the hoop was removed from the machine, but the sweater piece was left intact. Still hooped, the knit was gently lifted from the sticky surface.
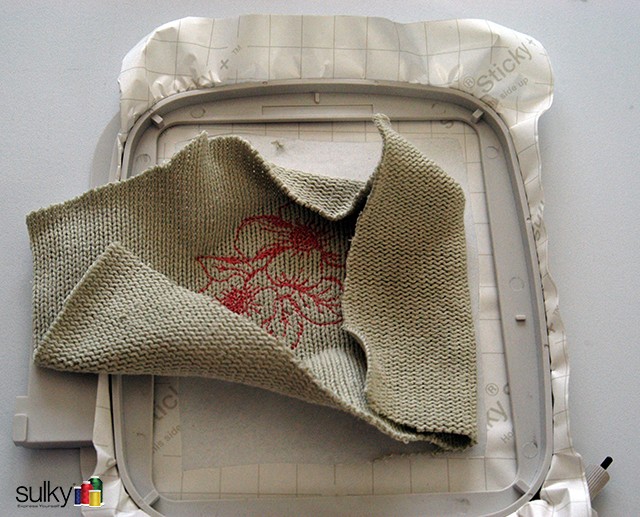
6. Once the outer edges of the design were lifted away, I took a pin and scored the hooped stabilizer, close to the freed edges.
7. The embroidered piece can easily be separated from the hooped stabilizer. You want to avoid pulling on a knit like this when you can.
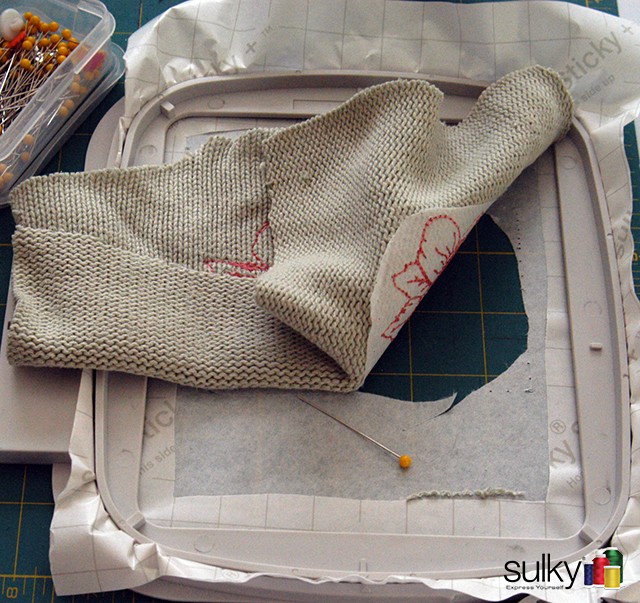
Results:
1. No thread breakage – which I was sure would happen!
2. More of a “hand-embroidered” effect – which was what I had hoped would happen!
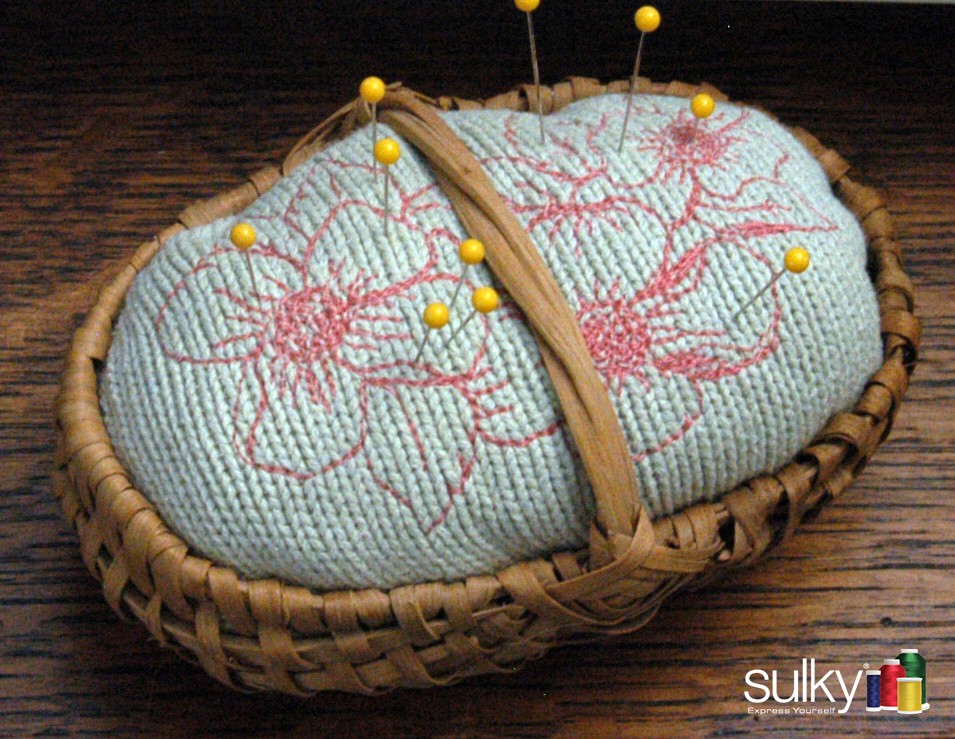
How about using this very small piece as a pin cushion? Gather the bottom into the shape of the container (in this case it was an oval shaped mini basket) stuffing the knit with polyester fiber fill. Shape it, make it fit. Wouldn’t this be a great memory gift when the sweater knit comes from a loved one?
Now use it every day as you continue to imagine and create with Sulky!!

Excellent article
Thanks for the very useful guide to embroidery on sweater knits! Great summary of entirely process, as well as stabilizing options.
The best article I have seen on Knits. Thank you. I have passed it on!
Would I use the same process for tissue weight T Shirt knits?
Essentially. Instead of Super Solvy, use Solvy. Also, after embroidery is complete, fuse Soft ‘N Sheer to the embroidery wrong side to prevent scratches on the skin and provide continuing stabilization through washing and wear.